Thursday, January 31, 2008

Migrating Users from Windows 2000 forest to Windows 2003 forest and keep the user profile and its application settings


Create a two-way trust between two domains for simplification.

Please choose the External Trust on both domains.

Install Windows server support tools on VAN.COM

Disabling the SID Filtering by:

C:\Program Files\Support Tools>netdom trust van.com /domain:vanstudents.com /quarantine:no /usero:administrator /passwordo:password

setting the trust to not filter SIDs.
The command completed successfully.

C:\Program Files\Support Tools>netdom trust vanstudents /domain:van /quarantine:no /usero:administrator /passwordo:password

Setting the trust to not filter SIDs.
The command completed successfully.

Install ADMT 3.0.1 on Windows Server 2003 domain: VAN.COM;

C:\>Admt KEY /option:create /SourceDomain:VANSTUDENTS /KEYFILE:mypass
The password export server encryption key for domain 'VANSTUDENTS' was successfully created and saved to 'C:\mypass.pes'.
Copy the following file from C:\Windows\ADMT directory to the domain controller of VANSTUDENTS domain:
Instmsiw.exe
PwdMig.exe
PwdMig.ini
PwdMig.msi

Don't use the files from Windows Server 2003 CD.

Copy the mypass.pes to the domain controller of VANSTUDENTS domain.

Create a domain user: User1 in VAN.COM domain; It will be used to start the PES service in VANSTUDENTS domain.

ADD VAN\Administrator to VANSTUDENTS\Administrators domain local group. Please don't forget this step.

At VANSTUDENTS domain controller, run PwdMig.msi,


Reboot the Domain Controller of VANSTUDENTS domain.

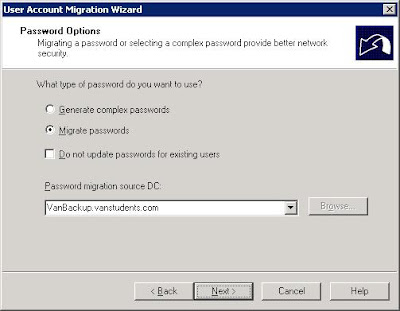
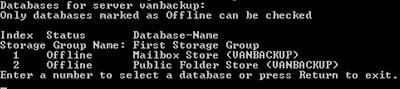
Start the Password Export Server service (only when you migrate the password.)

Run ADMT tools from domain controller of VAN.COM domain;


Make sure that Password Export Server starts at the VANSTUDENTS.COM!


Answer YES to all the prompts shown.

Reboot the domain controller of VANSTUDENTS.COM

AND Make sure that Password Export Server starts at the VANSTUDENTS.COM!

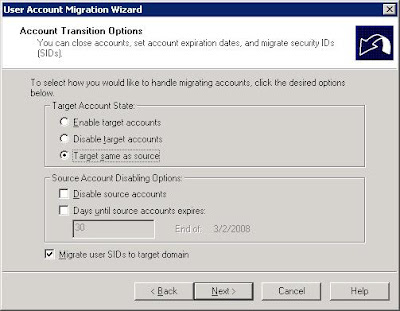
Re-run the Migration Wizard

The usernames and their passwords are migrated.

========================


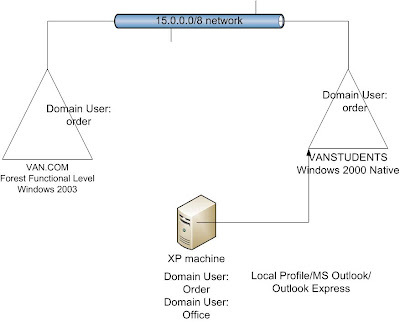
After you migrate the OFFICE and ORDER users from vanstudents domain to van.com domain, disjoin the XP Machine from VANSTUDENTS domain and Join it with VAN.COM domain;
Both Office and Order users' profile and application settings are kept. The MS OUTLOOK settings and OUTLOOK Express settings are kept.
=============

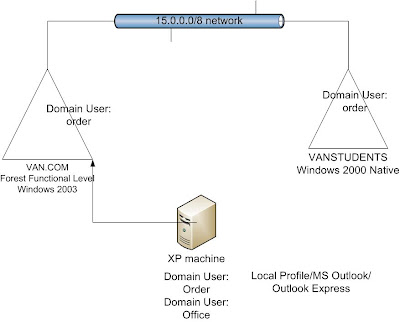
Instead of disjoining from VANSTUDENTS domain and rejoining it to VAN.COM domain, you should use the ADMT tool -- Computer Migration Wizard


After the two-way trust relationship was established, you can initiate the Computer Migration Wizard from Windows Server 2003.


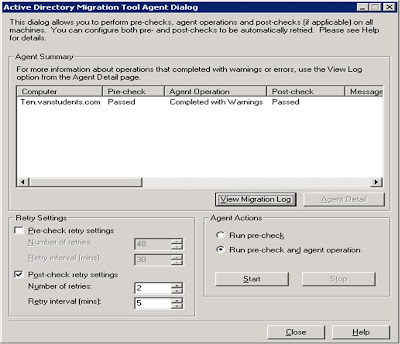
I had two problems to run the DISPATCH agent.


Log file:

[Agent Dispatch Section]

The Active Directory Migration Tool Agent will be installed on Ten.vanstudents.com

Unable to ping the machine 'Ten.vanstudents.com'. Make sure it is up and running.

....

....

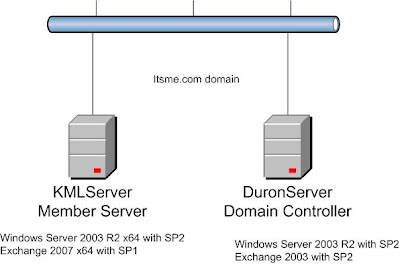
My Windows Server 2003 has two NIC cards equipped with one accessing Internet. I disable the Internet NIC. Solve the unable to ping the machine problem.


Access is denied.

Failed to install agent on file://ten/, rc=5 Access is denied.

Unable to access ADMIN$ share on the machine 'Ten.vanstudents.com'. Make sure the share exists and the account running ADMT is a member of local administrators group on the machine 'Ten.vanstudents.com'.

....

....


I visited the XP machine and add the VAN\Administrator to be the member of administrators group.


After that, I got the following:

The XP machine joins the VAN.COM domain. Because you have already migrated the user accounts with passwords from VANSTUDENTS domain to VAN.COM domain, the user profiles and settings are kept when they log on to the VAN.COM domain.

Understand the trust creation


I configure the network connection with the following for all domains.


Each domain has a DNS server, which hosts its own DNS domain and other two DNS domains (secondary type).


As shown above, the trust type is an important concept. Because I raised both Contoso.com and VAN.COM to Forest Functional Level, I can have the forest-wide trust type established.
I made mistake when I was establishing the trust between VANSTUDENTS.COM and VAN.COM. From VAN.COM, I create a Forest-wide type. From VANSTUDENTS.COM, the only choice is the EXTERNAL. The trust cannot be verified. Both sides must use the same TRUST TYPE. The only one between a Windows 2000 forest and Windows 2003 forest is the EXTERNAL.

Wednesday, January 30, 2008

Transfer the Files and Settings from XP to Vista (Same Domain)


Before you start the transfer, you must install Microsoft Office and other programs in the new Vista computer.

New Vista Machine: Log on as Administrator

All Programs--Accessories--System tools--Windows Easy Transfer wizard

Let the Windows Easy Transfer wizard to copy its migwiz program to a Flash Drive or network drive.

From Old XP machine, run the migwiz program on a Flash Drive or Network drive.

The process can transfer all user accounts and their settings. It is a big improvement from XP's Files and Settings transfer wizard.

XP: Files and Settings transfer

You bought a new system for a customer. His user account name is OFFICE. Your job is to transfer all the profile settings at his old XP machince to the new XP machine.


Using the Files and Settings transfer wizard

Turn off the firewall at both Old and New XP machines.

I want to transfer OUTLOOK and OUTLook express settings.

Logon as OFFICE at NEW XP MACHINE,
RUN Files and Settings Transfer Wizard--New Computer--next

Go to the Old XP Machine and logon as OFFICE
RUN Files and Settings Transfer Wizard--Old Computer
Choose the Home and small office network--Next--Next

Go to the Old XP Machine to write down the password of the transfer session
Go the New XP Machine to input the session password.

Logoff the OFFICE from the New OFFICE Machine and logon as OFFICE again;
Check the Favourites, Desktop settings, especially the Outlook express (account setting, contact, etc). MS Outlook settings will be put in OUTLOOK Express if You didn't run OUTLOOK before you did the transfer. Anyway, you can import the settings from OUTLOOK express.

Observation:
Files and Settings Transfer Wizard can only be used for a user once a time. This is why I logged on to both Old and New computers as the same account:Office

Sunday, January 27, 2008

Exchange 2007: Get-ExchangeServer and Active Directory not available

KMLServer:
Login as default Administrator and open Exchange Management Console;
Everything is fine. However, without reason, the Exchange Management Console cannot access Active Directory.
--------------------------------------------------------
Microsoft Exchange Error
--------------------------------------------------------
The following error(s) were reported while loading topology information:

get-ExchangeServer Failed
Error:
Active Directory server duronserver.itsme.com is not available. Error message: A local error occurred.

I can open Active Directory Users and computers from KMLSERVER.

My only solution is to create a new account, e.g. Paul. And add the user PAUL to Exchange Organization Administrators group and Enterprise Admins group.

Logon as PAUL to open Exchange Management Console.

====

Weird! After I configure the Free/Busy folder replication partner by logging on as PAUL, I logged on as the default Administrator and ran the Exchange Management Console without error.

===
Solution

The Administrator profile is corrupt. I delete the Administrator's profile and log off and log back on. The problem still exists.

I modify the Administrator account's Profile property to \\Lina-PC\DShare\Profiles. Log the Administrator back on. Exchange Management Console got through all the initilization process without error.
===========
1. Start -> Run
2. Enter "control keymgr.dll"
3. Remove all stored passwords relating to Exchange servers and DCs

copy from http://forums.microsoft.com/TechNet/ShowPost.aspx?PostID=1267710&SiteID=17

Exchange 2007: OWA and Schedule+Free/Busy folder

During the installation of Mailbox role, the following warning message shows. What does it mean?

Warning:
If Outlook Web Access is in use, you should replicate the free/busy folder on this server to every other free/busy server in the organization. This step should be performed once Setup completes.


DuronServer:Active Directory Users and Computers

Create users with mailboxes:Paul

KMLServer:Exchange Management Console


Create a mailbox:Tom2007

Set up a profile for Administrator and start it

Create a public folder with Calendar Items type as shown blow:

Create a outlook profile for Tom2007 and a outlook profile for Paul;

Open Outlook with Tom2007's profile and click on the Shared Schedule item;

set up a Free/Busy information; Close the outlook;

Open Outlook with Paul's profile;You will find the Tom2007 posted Free/Busy information.

How about access mailbox Paul from http://duronserver/exchange/paul?

The schedule information is all there.

How about access mailbox Tom2007 from https://kmlserver/owa?

As shown above, the message "Click here to open this folder with Microsoft Exchange 2003 Outlook Web Access." appears.


From here, I just see the meaning of the warning message. How to configure the replication of the Free/Busy folder?

After SP1 installed, Publlic Folder Management console is introduced. -->Exchange Management Console -->Tools -->Public Folder Management console

-->Open System Public Folder-->Click Schedule+Free/Busy folder


Click on Exchange Administrative Group-->properties


Add a Public Folder Store(DuronServer) as a replica.

It's necessary to modify the replication interval.

DuronServer:

Exchange System Manager--Locate the Shared Schedule under the All Public Folder

Wait for the replication to complete (15-30 minutes);

HTTPS://kmlserver.itsme.com/owa

Logon as a itsme\Tom2007
Click Public Folder-->click on Shared Schedule calendar item--done.

Thursday, January 24, 2008

Exchange 2003: cannot mount a mailbox store


When your mailbox store is corrupted, you cannot mount it. You can use the following steps to mount it.


Open a command prompt,


c:\Program Files\exchsrvr\bin\eseutil /p "c:\Program Files\exchsrvr\mdbdata\priv1.EDB"
C:\Program Files\exchsrvr\bin\eseutil /d "C:\Program Files\exchsrvr\mdbdata\priv1.EDB"

c:\Program Files\exchsrvr\bin\eseutil /p "c:\Program Files\exchsrvr\mdbdata\pub1.EDB" C:\Program Files\exchsrvr\bin\eseutil /d "C:\Program Files\exchsrvr\mdbdata\pub1.EDB"

Make sure the information store service starts. You can only check databases that are offline.To check the integrity of the information store at Server:Vanbackup, type:


C:\Program Files\exchsrvr\bin>isinteg -s vanbackup -fix -test alltests


After the ESEUTIL.exe performs successfully, it is recommended that you immediately perform a full backup of this database. If you restore a backup made before the repair, the database will be rolled back to the state it was in at the time of that backup.

Wednesday, January 23, 2008

Vista: password protected sharing


When the Password protected sharing is on, to access any share (printer and folders alike), you must have a valid user account and password in the computer. When you browse the computer on network, the logon Windows shows automatically.
If the password protected sharing is off, you can access a shared printer or folder with Everyone access permission without logon.
The Password protected sharing is only available when it does not join the domain.

RRAS: VPN connects two sites

Network Layout:
Setup RRAS 2 server:
Configure Routing and Remote Access Server
Secure Communication Between two private networks
Demand-dial connections--YES
Address Assignment--From a specified range of address 10.1.1.1 to 10.1.1.100
Demand-dial Interface name: RRAS 2
Connection type: VPN
VPN type: PPTP
Destination Address: 15.11.12.13
Protocols and Security:
  • Route IP packets on this interface
  • Add a user account so a remote router can dial in
Static Routes for Remote network: 192.168.1.0 255.255.255.0

Dial-in User Account:
Pay attendtion to the user name: RRAS 2--the Demand-dial interface name;
Dial out configuration:


=====

Setup RRAS 1 server:
Configure Routing and Remote Access Server
Secure Communication Between two private networks
Demand-dial connections--YES
Address Assignment--From a specified range of address 192.168.1.2 to 10.1.1.100
Demand-dial Interface name: RRAS 1

Connection type: VPN


VPN type: PPTP


Destination Address: 15.21.22.23


Protocols and Security:

  • Route IP packets on this interface
  • Add a user account so a remote router can dial in

Dial-in User account: RRAS 1
Static Routes for Remote network: 10.0.0.0 255.0.0.0

Dial-out User account: RRAS 2
It's better to change the Demand-Dial interface to permanent connection.

Thursday, January 17, 2008

exchange 2007 SP1

When I upgrade the Exchange server 2007 sp1, the warning message shows at the HUB TRANSPORT ROLE.

Warning:
Setup cannot detect an SMTP or Send connector with an address space of '*'. Mail flow to the Internet may not work properly.

Solution:

Open Exchange Management Console
Create a New Send connector with address space of '*' for Internet mail flow. Run the upgrade again, no error or warning.

Vista: Windows Firewall

What is the difference between AdD Program and Add Port?

You should always add a Program to the exception list. If you add a port, it would allow any application on your computer to accept connections from that port. If you add a Program, that program can accept connections from outside(firewall allows it.)
Another scenario for adding a program as an exception:
The appication uses port 80 to negotiate a listening port. After establishing the listening port, the application uses dynamic ports above 5000. This can be acomplished by adding the program as an exception.

Saturday, January 12, 2008

Exchange: a pure Exchange Server 2007 environment does not support the installation of Exchange Server 2003.

I create a Active Directory Domain and install a Exchange Server 2007. And then, I am trying to install Exchange Server 2003 into the pure Exchange server 2007 environment. I got the error message:
"setup failed while installing sub-component Microsoft Exchange Server-Level objects with error code 0x80072030"


cause:
A pure Exchange Server 2007 environment does not support the installation of Exchange Server 2003.

Friday, January 11, 2008

Vista:cannot apply the Vista WIM image file

Boot the computer with Windows PE, using Drvload tool adds out-of-box drivers to a booted Windows PE image. It takes one or more driver .inf files as inputs.

To add a driver to an offline Windows PE image, use the peimg tool.

Vista: Migrate User Settings Using the User State Migration Tool (USMT 3.0)

USMT captures user accounts including desktop, and application settings, as well as a user's files, and then migrates them to a new Windows installation.


  • side-by-side migration-- you are copying the data from the old computer to a new computer)
  • wipe-and-load migration--you are saving the data and then formatting the computer's hard disk and performing a clean install.
  • If you are only upgrading your operating system, USMT is not needed.
Scanstate.exe--old computer
Loadstate.exe --new computer

Example 1: migrating all users and their settings within the same domain
=========
You must install the USMT on both old and new computers.

At old computer
change to the directory
C:\programs files\usmt3.1

scanstate \\\servername\sharename\computer1 /i:miguser.xml /i:migapp.xml /i:migsys.xml

At the new computer
change to the directory
C:\programs files\usmt3.1

loadstate \\\servername\sharename\computer1 /i:miguser.xml /i:migapp.xml /i:migsys.xml
=========

Example 2: migrating a specific domain user from XP machine A to XP machine B
====
Source Computer: VANSTUDENTS domain and XP machine
C:\Program Files\USMT301>scanstate z:\Misc\order /ue:*\* /ui:vanstudents\order /i:miguser.xml /i:migapp.xml /i:migsys.xml

Log messages are being sent to 'C:\Program Files\USMT301\ScanState.log'
Scanning the computer for files and settings...
Collecting files and settings for:
This Computer 'VANSTUDENTS\order' (user 1 of 1)
Saving files and settings - 2 minute(s) remaining...
ScanState has successfully collected the files and settings.

Target Computer: VANSTUDENTS domain and XP machine
C:\Program Files\USMT301>loadstate Z:\Misc\order /ue:*\* /ui:vanstudents\order /i:miguser.xml /i:migapp.xml /i:migsys.xml

Log messages are being sent to 'C:\Program Files\USMT301\LoadState.log'
Scanning the computer for files and settings...
Applying files and settings -
LoadState has successfully restored the files and settings.

====
Pay attention to the /ue:*\* /ui:vanstudents\order must be used with both scanstate and loadstate
====

If you are migrating the user states of only a few computers, you can use Windows Easy Transfer. USMT is intended for large deployment of XP and Vista.

You can use Windows Easy Transfer to move user accounts, files and folders, program settings, Internet settings and favorites, and e-mail settings from an existing Windows computer to a new computer running Windows Vista.

Windows Easy Transfer in Windows Vista supports the following operating systems:
•Windows 2000 SP 4
•Windows XP SP 2
•Windows Vista

At the new computer with Vista

make sure that you have installed all programs before you transfer the program settings.
start Windows Easy Transfer wizard, --This is new computer--save the Migwiz files to a network location.

At the old computer, run Migwiz\migsetup.exe file.

Thursday, January 10, 2008

Vista versions and features supported


  • If you want several languages to be available, you choose Vista Ultimate. You can not install all the other required languages as Vista Business does not support the 36 languages available in Windows Vista Ultimate.


  • If you want to support the legacy UNIX applications, the Vista enterprise edition is the choice.


  • Installation recommendation:


Microsoft recommends that you turn off anti-virus software during the install to ensure
that it does not interfere in the installation process. You should also use Dynamic Update
to allow the install to get any critical updates or drivers.


  • Your network has the various laptops and desktops. You want to install either Windows Vista Business or Windows Vista Ultimate. How many wim image should you create?


You will need one .wim file. Each .wim file can have several versions of Windows Vista, and can be used on different computers regardless of their hardware configuration.


  • To support the Windows Aero user experience, you must have a video adapter card that is Windows Display Driver Model (WDDM)-compatible.

Sunday, January 6, 2008

Vista: Creator Owner special identity and public accessible folder

Create a folder: DataStore

Permissions:

Creator Owner has Full Permissions on Subfolders and files.


Authenticated Users has the Create files/write data, Create folders/append data, etc, permissions on This folder only.
Logging on as Lina and create Folders or Files, you will find that only Lina can access them.
Logging on as Jonathan and create Folders or Files, you will find that only Jonathan can access them.
===

The Creator Group identity Windows 2000 uses this group to automatically grant access permissions to users who are members of the same group(s) as the creator of a file or a directory.
The Creator Owner identity The person who created the file or the directory is a member of this group. Windows 2000 uses this group to automatically grant access permissions to the creator of a file or directory.


Vista:cannot delete the flash9e.ocx and flashutil9e.exe --deny the Write Attribute

As an administrator, when I am trying to delete the flash9e.ocx and flashutil9e.exe files, I got the popped up message box--you need permission to perform this action.


why?


Check the Advanced Security of both files, you have the following:

Both Everyone and ANONYMOUS LOGON have the Write Attribute denied.

Removing both entries, you can delete the two files.

Vista and XP: Hide an User Account from Welcome Screen

HKEY_LOCAL_MACHINE\SOFTWARE\Microsoft\Windows NT\CurrentVersion\Winlogon


Subkey: SpecialAccounts


HKEY_LOCAL_MACHINE\SOFTWARE\Microsoft\Windows NT\CurrentVersion\Winlogon\SpecialAccounts


Subkey: UserList


HKEY_LOCAL_MACHINE\SOFTWARE\Microsoft\Windows NT\CurrentVersion\Winlogon\SpecialAccounts\UserList


Add a value;

The following screenshot hides two user accounts Lina and Jonathan.


Saturday, January 5, 2008

Vista: ImageX.exe captures a Vista workstation

Assuming you have created a Vista Windows PE media (CD) and a Vista workstation with necessary software installed;

  • Start the Vista workstation;
  • Run sysprep.exe command:
C:\windows\system32\sysprep\sysprep.exe /oobe /generalize /shutdown

  • Insert the Windows PE media CD into the workstation DVD Drive;
  • Turn on the computer and press any key to boot from the Windows PE media CD;

--My CD is at E: drive and imageX.exe command is under imageTools folder. I will save the image in D: drive. C: drive is the Vista image.--

Capture the Vista workstation image

E:\imageTools\ImageX.exe /compress fast /capture C: D:\myimage.wim "My Vista Install" /verify

After the image was captured, connect to a network share:

Net use Y: file://computername/network_share/
Copy D:\Myimage.wim y:

==

Build new computers using myimage.wim

Boot the new computer from the Windows PE media CD;

diskpart
select disk 0
clean
create partition primary size=20000
select partition 1
active
format
exit

net use Y: file://computername/network_share/
copy Y:\Myimage.wim c:

Apply the image to the hard drive

E:\imageTools\ImageX.exe /apply C:\Myimage.wim 1 c:

Done.
====

Application of the WIM file:

I install the Vista in C: and Windows 2003 in D: drive.

From Vista, run imageX.exe as:

C:\Program Files\Windows AIK\Tools\PETools>ImageX.exe /compress fast /capture D: C:\exchange2007.wim "Windows 2003 with Exchange 2007" /verify

To rebuild the Windows 2003 with Exchange 2007, from Vista you run:

C:\Program Files\Windows AIK\Tools\PETools>imagex /apply c:\exchange2007.wim 1 D:

--Pretty fast recovery--

Vista: Create Windows PE media

Assuming you have already installed the AIK package in your computer


Cd Program Files\Windows AIK\Tools\PETools\

Copype.cmd x86 C:\WinPE_x86


C:\WinPE_x86>cd iso

C:\WinPE_x86\ISO>mkdir imageTools
C:\WinPE_x86\ISO>cd imageTools
C:\WinPE_x86\ISO\imageTools>

C:\WinPE_x86\ISO\imageTools>copy "c:\Program Files\Windows AIK\Tools\x86\imagex.exe" .


Using the Notepad.exe editor to create the wimscript.ini file with the following exclusion list:[ExclusionList]
ntfs.log
hiberfil.sys
pagefile.sys
"System Volume Information"
RECYCLER
Windows\CSC
[CompressionExclusionList]
*.mp3
*.zip
*.cab
\WINDOWS\inf\*.pnf


save the wimscript.ini file to C:\WinPE_x86\ISO\imageTools>


Create an image file (.iso) by using the Oscdimg tool.


C:\WinPE_x86\ISO\imageTools>Cd \Program Files\Windows AIK\Tools\PETools

C:\Program Files\Windows AIK\Tools\PETools>oscdimg.exe -n -bc:\winPE_x86\etfsboot.com c:\WinPE_x86\ISO c:\WinPE_x86\winpe_x86.iso


Burn the winpe_x86.iso to CD;

Friday, January 4, 2008

Vista: Automated Installation Kit (AIK) and answer file

Google.com for Windows Automated Installation Kit (AIK) to download vista_6000.16386.061101-2205-LRMAIK_EN.img file.

Using the UltraISO to extract it to a folder in your Hard Drive;

For 32-bit OS, you need the two files: WAIKX86.msi and WINPE.cab.

I burned the img file to DVD and ran the AIK setup, it asked me for insert the AIK CD even though the DVD was in DVD drive.


Work at Windows Server 2003
install the WIK software;
insert the Vista DVD into DVD drive;
copy the source\Install.wim file to C:\Vista_installation folder;
run the Windows System Image Manager;
File menu -- click Select Windows Image --C:\Vista_installation\install.wim;
Select the Vista Business --Generate a catalog file;
New Answer File;

Add Components;

Microsoft-Windows-Setup\DiskConfiguration\Disk\CreatePartitions\CreatePartition
-->1 Windows PE
Microsoft-Windows-Setup\DiskConfiguration\Disk\ModifyPartitions\ModifyPartition
-->1 Windows PE
Microsoft-Windows-Setup\ImageInstall\OSImage\InstallTo
-->1 Windows PE
Microsoft-Windows-Setup\UserData
-->1 Windows PE
Microsoft-Windows-International-Core-WinPE
-->windowsPE

Configure Windows Settings:


Microsoft-Windows-International-Core-WinPE
InputLocale = en-us
SystemLocale = en-us
UILanguage = en-us
UserLocale = en-us
Microsoft-Windows-International-Core-WinPE\SetupUILanguage
UILanguage = en-us
Microsoft-Windows-Setup\DiskConfiguration
WillShowUI = OnError
Microsoft-Windows-Setup\DiskConfiguration\Disk
DiskID = 0
WillWipeDisk = true
Microsoft-Windows-Setup\DiskConfiguration\Disk\CreatePartitions\CreatePartition
Extend – false
Order = 1
Size = 20000
(Note: This example creates a 20 GB partition.)
Type = Primary
Microsoft-Windows-Setup \DiskConfiguration\Disk\ModifyPartitions\ModifyPartition
Active = true
Extend = false
Format = NTFS
Label = OS_Install
Letter = C
Order = 1
PartitionID = 1
Microsoft-Windows-Setup\ImageInstall\OSImage\
WillShowUI = OnError
Microsoft-Windows-Setup\ImageInstall\OSImage\InstallTo
DiskID = 0
PartitionID = 1
Microsoft-Windows-Setup\UserData
AcceptEula = true
Microsoft-Windows-Setup\UserData\ProductKey
Key = P6VCV-449FC-94R4B-Q4GQ8-WQQJM
WillShowUI = OnError

After entering all the values, Tool menu--validate the answer file;

After passing the validation, save it to c:\Vista-installation\Autounattend.xml ;
copy the autounattend.xml file to floppy;


========

Work at the new computer

insert the floppy with autounattend.xml file to floppy drive;
insert the Vista DVD into DVD drive;
turn on the computer and make sure it boots from the Vista DVD;
Windows Vista Setup (Setup.exe) searches all removable media for an answer file named Autounattend.xml and completes the installation fully-unattended;

Tuesday, January 1, 2008

Exchange 2007 installation.

  • Server 2003 SP1 or later
  • .NetFrameWork 2.0 and its hotfix
  • Powershell
  • IIS 6.0
Outlook 2003 or earlier clients reqire a public folder database to connect to Exchange Server 2007. During the Exchange Server 2007 installation, a public folder database can be created. If not, you can create a public folder database after installation complete. I choose no outlook 2003 or entourage clients. I will create a public folder database later.

When IIS 6.0 is installed, the NNTP and SMTP services are not required (different from Exchange 2000/2003 installation).

Hyperthreading and Dual Core

What is HyperThreading?

Hyper-Threading technology enables a single CPU to act like two CPUs. A multithreaded software can execute threads in parallel within a single processor.

What is dual-core processor?
The Intel dual-core processor consists of two complete execution cores in one physical processor. Imagine that a dual-core processor is like a four-lane highway—it can handle up to twice as many cars as a two-lane road without making each car drive twice as fast.