Showing posts with label Exchange Server 2003. Show all posts

Saturday, October 25, 2008

DSACLS.exe to restore permissions for Default global address list

www.1ask2.com

You must have the Windows Support Tools installed.


ADSIEDIT.MSC console


Deny READ Permission for Authenticated Users.


You cannot modify the permissions of Default Global Address List.

You cannot create new outlook profiles.

C:\Program Files\Support Tools>dsacls.exe "CN=Default Global Address List,CN=All Global Address Lists,CN=Address Lists Container,CN=Workopera,CN=Microsoft Exchange,CN=Services,CN=Configuration,DC=work,DC=com" /R "Authenticated Users"


C:\Program Files\Support Tools>dsacls.exe "CN=Default Global Address List,CN=All Global Address Lists,CN=Address Lists Container,CN=Workopera,CN=Microsoft Exchange,CN=Services,CN=Configuration,DC=work,DC=com" /I:T

Saturday, May 3, 2008

Exchange2003:SMTP DNS reverse lookup

Sender ID Framework


verifying the domain name from which e-mail messages are sent. Sender ID validates the origin of e-mail messages by verifying the IP address of the sender against the alleged owner of the sending domain.

You can not implement Sender ID Filter feature in lab. From the e-mail I got from Microsoft Senderid team, you should find out a clue.

=======
Thank you for writing to the Sender ID Management Team. This is Paul and I gather that you would like to have your itsme.com domain to be added to the Sender ID program.

We have added your itsme.com domain to the Sender ID queue. However, we were not able to add this domain to the Sender ID program as we were unable to find any SPF record associated with this domain. If the domain provided to us is not the correct name please let us know, by replying to this email.

It is possible that you have made the changes to your DNS information, but this has not fully replicated throughout the Internet. The good news is that you do not need to notify us when you create any revisions to your SPF record since we will automatically pull the current record from the DNS daily. Once a SPF record is found your domain will leave the Sender ID queue and be added to the Sender ID program.

You can find technical information on the Sender ID program at
http://www.microsoft.com/senderid.

=============

Create a SPF record in Windows DNS server


  • Forward lookup zone --a resource record type, click Text (TXT), and then click Create Record.

  • If you add a record for the parent domain, leave the Record name box blank. If you do not add a record for the parent domain, type the single part name of the domain in the Record name box.

  • In the Text box, type v=spf1 mx -all.


Even if your domain has no outbound e-mail servers, you can help protect your domain from spoofing by publishing an SPF record in the DNS that states this.


Ensure that your domain can be correctly identified as the purported responsible domain (PRD) for each message you send. This means that the sender's domain must be shown in certain headers of the e-mail message. ???


As long as sending servers use their own domain name in the ―From‖ header of the message and publish an SPF record, they are already compliant with Sender ID.


Therefore, e-mail senders must ensure that their domain is the one that is identified as the PRD--Purported Responsible Domain


How does Sender ID Framework work?


  1. Sender sends an e-mail to Receiver.


  2. Receiver’s inbound e-mail server receives e-mail and calls its Sender ID Framework.


  3. The Sender ID Framework looks up the SPF record of the domain that Sender is using for sending the mail.


  4. The receiving Mail Transfer Agent (MTA) determines if the outbound Mail Server IP address (Sender side) matches IP addresses that are authorized to send mail for the user.


If there is a SPF record for the sender, the IP address of the sending server is checked against the IP addresses listed in SPF record. If there's a match, the message is validated as authentic. If, on the other hand, the SPF record on the sender's domain does not match the IP address the message came from, it fails, resulting in a negative score and potential placement in the junk mail folder.


Microsoft DNS: text record for SPF


-------------


Mail may legitimately originate from IP addresses not identified above, however, use of such IP addresses is discouraged and may not be permitted in the future.


v=spf1 a mx ptr mx:exclientserver.itsme.com mx:artwork.itsme.com ~all


---------


Only exclientserver.itsme.com and artwork.itsme.com send outgoing mail.


v=spf1 mx mx:mx:exclientserver.itsme.com mx:artwork.itsme.com -all


--------------


The above record shows that exclientserver.itsme.com and artwork.itsme.com deliver out-bound e-mail for itsme.com domain.

Simple Mail Transfer Protocol (SMTP), which is used to send and receive e-mail, was never designed to verify the sender of an e-mail message. With this technological loophole, any name and address can be inserted as the sender. As a result, content-filtering or anti-spam measures cannot rely on header information alone to ensure that messages actually come from where they say they do.

Enable a Reverse DNS Lookup
SMTP virtual server-- Properties--Delivery tab, click Advanced == select the Perform reverse DNS lookup on incoming messages check box.

If you select this option, Microsoft SMTP Service tries to verify that the IP address of the client (Sending SMTP server???) matches the host or domain that is submitted by the client in the EHLO or HELO command.

If the reverse DNS lookup is successful, the Received header remains intact.
If the verification is unsuccessful, "unverified" appears after the IP address in the Received header of the message.

SMTP service does not reject the "unverified" message. But it can be used in Intelligent Filter (I assume).

Sender ID
http://technet.microsoft.com/en-us/magazine/cc160870.aspx

Sender ID seeks to verify that every e-mail message originates from the Internet domain from which it claims to have been sent. This is accomplished by checking the address of the server sending the e-mail against a registered list of servers that the domain owner has authorized to send e-mail. Verification is performed automatically by the Internet service provider (ISP) or the recipient's mail server before the message is delivered to the user's Inbox.

Authentication notifies the inbound mail system of whether the message can be validated as coming from the claimed sender. It does not reject the message.

You should publish an SPF record for your SMTP server. See http://www.microsoft.com/senderid for detail. SPF refers to Sender Policy Framework. SIDF refers to Sender ID Framework.
The Sender ID Framework SPF Record Wizard (http://www.microsoft.com/senderid/wizard) provides a step-by-step process for surveying a domain's mail servers and creating customized records ready for posting.

When Sender ID is enabled on the receiving SMTP mail server, the receiving SMTP mail server pings the domain's zone file in the DNS for the existence of an SPF record. Once found, the IP address of the sending server is checked against the IP addresses listed. If there's a match, the message is validated as authentic. If, on the other hand, the SPF record on the sender's domain does not match the IP address the message came from, it fails, resulting in a negative score and potential placement in the junk mail folder.

Exchange 2007 transport Architecture

SMTP Receive
When messages are received at a Hub Transport server, transport rules are applied and, if anti-spam and antivirus agents are configured, these agents provide an additional layer of anti-spam and antivirus protection. The SMTP session has a series of events that work together in a specific order to validate the contents of a message before it is accepted into the organization. After a message has passed completely through SMTP Receive and is not rejected by receive events or by an anti-spam and antivirus agent, it is put in the Submission queue.
Submission
Submission is the process of putting messages into the Submission queue.


  • SMTP submission through a Receive connector


  • Submission through the Pickup directory or the Replay directory. These directories exist on the Hub Transport server or Edge Transport server. Correctly formatted message files that are copied into the Pickup directory or the Replay directory are put directly into the Submission queue.


  • Submission by the Store driver, which picks up messages from a sender’s Outbox as they are sent


  • Submission by an agent

Tuesday, April 1, 2008

Configuring Exchange 2003 SMTP virtual as a smart host

Exchange server 192.168.0.3:


Exchange Server with IP address 192.168.0.64:
Delivery option:

Monday, March 24, 2008

Outlook: Export to pst file and import it into another account

Kevin Smith uses outlook for the daily mail communication. Your job is to import the mail, contact, task, etc, of Kevin Smith into Tom Hicken's outlook.


Open outlook as Kevin Smith


File menu--Import and Export;


Export to a file; -->personal folder file (.pst)


Make sure that "Include subfolders" is selected.
Open outlook as Tom Hicken, File menu--Import and Export --Import from another program or file --PST file


Saturday, March 22, 2008

Exchange2003: Relay and SMTP virtual server

====================================

RELAY does not apply to the MAPI users.
====================================

Scenario 1:
With default configuration, one SMTP Virtual Server can accept e-mail from Internet and can relay e-mail for authenticated clients.

For POP3 and IMAP clients to send e-mail through the SMTP virtual server, you must select the following:


-----
The pop3 users in itsme.com domain can relay e-mail even though the outlook client does not select "My Outgoing Server (SMTP) requires authentication".
-----

====================================
Send test e-mail message: Cannot send the message. Verify the e-mail address in your account properties. The server responded: 454 5.7.3 Client does not have permission to submit mail to this server.

Reason:

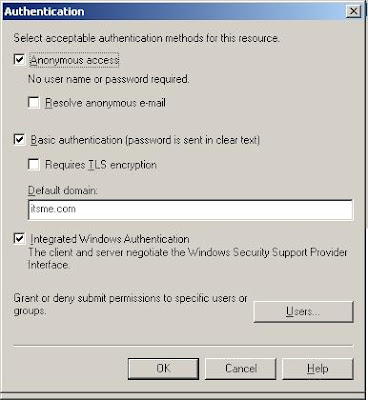
SMTP Virtual Server--authentication

When the Anonymous Access authentication is not allowed, you must set up your outlook client as:


As shown above, the relay restriction is set to "Only the list below" but the list is empty. With "Allow all computers which successfully authenticate to relay, regardless of the list above" option selected, if outlook client is set to "my outgoing smtp server requires authentication", pop3 and IMAP clients can send e-mail through the SMTP virtual server.

With ANONYMOUS AUTHENTICATION unchecked, other SMTP server cannot send e-mail to your domain.

That is why we should create one SMTP virtual server for accept SMTP connection. The relay restriction should be "only the list blow" with empty list and uncheck "allow all computers which suchessfully authenticate to relay, regardless of the list above". The SMTP port will use the 25. Then, create another SMTP virtual server for authenticated POP3 and IMAP clients relay. The SMTP virtual server will use a port other than 25.

=========================

Scenario 3:

With the default authentication of SMTP virtual server (anonymous access, basic and integrated windows authenticaion), the following settings will set the SMTP virtual server to relay e-mail for everyone, including anonymous user. Don't use the option.


Tuesday, March 4, 2008

Server: MX record

This summary is not available. Please click here to view the post.

Thursday, January 24, 2008

Exchange 2003: cannot mount a mailbox store


When your mailbox store is corrupted, you cannot mount it. You can use the following steps to mount it.


Open a command prompt,


c:\Program Files\exchsrvr\bin\eseutil /p "c:\Program Files\exchsrvr\mdbdata\priv1.EDB"
C:\Program Files\exchsrvr\bin\eseutil /d "C:\Program Files\exchsrvr\mdbdata\priv1.EDB"

c:\Program Files\exchsrvr\bin\eseutil /p "c:\Program Files\exchsrvr\mdbdata\pub1.EDB" C:\Program Files\exchsrvr\bin\eseutil /d "C:\Program Files\exchsrvr\mdbdata\pub1.EDB"

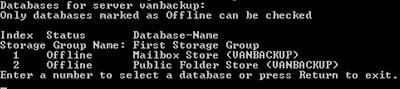
Make sure the information store service starts. You can only check databases that are offline.To check the integrity of the information store at Server:Vanbackup, type:


C:\Program Files\exchsrvr\bin>isinteg -s vanbackup -fix -test alltests


After the ESEUTIL.exe performs successfully, it is recommended that you immediately perform a full backup of this database. If you restore a backup made before the repair, the database will be rolled back to the state it was in at the time of that backup.

Thursday, November 29, 2007

Telnet and Exchange

http://support.microsoft.com/kb/153119

If you are having problems sending over SMTP between two Exchange servers, you Telnet on the sending server to connect to port 25 on the destination server.

1. Connect to your SMTP server
telnet vanbackup.vanstudents.com 25

2. Sent by a client to identify itself, usually with a domain name, the start of an ESMTP session.
ehlo test.com
250-VanBackup.vanstudents.com Hello [192.168.35.22]
250-TURN
250-ATRN
250-SIZE
250-ETRN
250-PIPELINING
250-DSN
250-ENHANCEDSTATUSCODES
250-8bitmime
250-BINARYMIME
250-CHUNKING
250-VRFY
250-X-EXPS GSSAPI NTLM LOGIN
250-X-EXPS=LOGIN
250-AUTH GSSAPI NTLM LOGIN
250-AUTH=LOGIN
250-X-LINK2STATE
250-XEXCH50
250 OK


3.
tell the receiving SMTP server who the message is from
MAIL FROM: admin@test.com
250 2.1.0 admin@test.com....
Sender OK

4.tell the receiving SMTP server whom the message is to:

(After the Subject line, press the ENTER key twice. To end the message, the last line must be with only one dot.) Temporiarily enable the anonymous relay, if SMPT virtual server does not allow the anonymous relay, you will get the error message: unable to relay for phil@eidam.com.


RCPT TO: phil@eidam.com
550 5.7.1 Unable to relay for phil@eidam.com
RCPT TO: phil@eidam.com
550 5.7.1 Unable to relay for phil@eidam.com
RCPT TO: administrator@vanstudents.com
250 2.1.5 administrator@vanstudents.com
DATA
354 Start mail input; end with .
Subject: Test Message


This is a test.
.
250 2.6.0 Queued mail for delivery

5. To close the connection, type
QUIT
===
Advanced testing

You can use a delivery receipt to test mail in both directions.

RCPT TO: phil@eidam.com notify=success,failure

Disable the open relay!!


Thursday, September 13, 2007

Exchange Clustering


The four shared SCSI drives (one partition includes the whole space) are assigned the following drive letters:W, X, Y, and Z.

The domain VIP.Com has one domain controller: DC and two members: Node1 and Node2. Node1 and Node2 run Windows Server 2003 Enterprise Edition. All Servers have IIS, ASP.NET, SMTP, NNTP installed. You run ForestPrep and DomainPrep on DC only. I will set up a cluster with Node1 and Node2.

Shutdown Node2; Node1 is running.

Setting up the Windows Cluster with clusterName: KINO with Quorum Disk W:

Start the Node2 server; and add it to the cluster KINO. Rename Group 0 to Horse Group; Group 1 to Snake Group; Group 2 to DTC Group.
You must install Exchange Server 2003 enterprise edition into both nodes of the Cluster.

Create a Microsoft Distributed Transaction Coordinator resource: MSdtc. The MSDTC resource depends upon Network Name resource and physical disk resource. Microsoft recommends that a independent disk should be used.

Create an IP resource and Network Name resource for Horse Group and Snake Group.

As you notice, the four Resource Groups have their own IP address resource and Network Name resource. In cluster, a Virtual Server is defined as a Resource Group, IP address, and Network Name.

Run Cluster Application Wizard to create the Exchange System Attendant resource, which automatically creates all other Exchange resources. Select the Horse Group as the Virtual Server. When you specify the Resource Name--HorseAttendant, please don't forget to configure the Advanced Properties --the Attendant resource has the dependency of Network Name and Physical Disk. For Horse Group, the only physical disk is the Disk X. The Exchange Data directory is automatically pointed to the Disk X.

Run the Cluster Application Wizard again. This time selects the Snake Group as the virtual Server. Assign the Attendant Resource Name as SnakeAttendant, which depends on Network Name and Physical Disk Y. The Exchange Data Directory is automatically pointed to the Disk Y.
The result resources are shown below:

Observation:

I create a four virtual servers: Cluster Group, Horse Group, Snake Group, and DTC Group. I configure an EVS on Horse Group and an EVS on Snake Group. Please don't configure an EVS on Cluster Group, because it has the Cluster Quorum Disk. You should separate the Quorum resource and MS DTC resource from the actual application resource.

To conserve the physical disk, you can delete the DTC Group and configure the MS DTC resource to depend on the quorum disk, even though this is not the best practice.

The Message Transfer Agent (MTA) exists only at the first EVS. Each cluster can have only one MTA resource, as shown above.

If you run both EVSs on the same node, the maximum 4 storage groups can exist. A node can only run 4 EVSs, each has only one storage group.

Note:Exchange 2000 and Exchange Server 2003 are not supported in a clustered configuration where the cluster nodes are domain controllers.

Do you notice how many IP addresses are used? 2xNode+EVSs+DefaultCluster+DTC.


On a cluster that is dedicated to Exchange, it is recommended that the MSDTC resource be added to the default Cluster Group. It is further recommended that the 'Affect the Group' option be unchecked for the MSDTC resource. This prevents a failure of the MSDTC resource from affecting the default cluster group.

Wednesday, July 18, 2007

Exchange server 2003

Sender Filter, Recipient Filter, Connection Filter, Sender ID Filter, and Intelligent Message Filter


You want to filter messages delivered to Study.COM.


First, SMTP virtual server of EXCHANGE SERVER 2003 in Study.com

-->properties --General Tab--Advanced button


Select Apply Sender Filter, Apply Sender ID Filter, Apply Recipient Filter, Apply Intelligent Message Filter, and Apply Connection Filter.


Second, Global Settings -- Message Delivery --Properties


Configuring the corresponding filters.

Connection Filter

For example, the Contoso.com DNS name is in Real-time Block List of a service provider AAA. Connection Filter of Study.Com includes the RBL service provider. When Contoso.com sends messages to Study.com, Study.COM exchange server sends a query to RBL service provider AAA. Because the positive match is found, Study.COM SMTP server rejects the SMTP connection from Contoso.com.

Sender Filter

You configure the sender filter of Study.com with ghost@contoso.com. When ghost@contoso.com sends messages to Study.com, it will be rejected.

Recipient Filter

Jane@study.com does not want any messages delivered from Internet. You can put Jane@study.com in the Recipient Filter. It also filters the messages that are directed to non-exist e-mail.

Sender ID Filter

Sender ID refers to SMTP server.

When Study.Com smtp server receives a message, it checks the sender's SMTP server address. The verification is automatically performed by ISP or recipient's mail server before the e-mail is delivered to user.


When do you modify Internet Message Formats?

"Internet Message Formats" does not affect the communication among MAPI mail clients within the same EXCHANGE ORGANIZATION.

When SMTP virtual server sends a MAPI message to an Internet client, it assigns a content type (MIME) to attachments based on the extension of the attachment file.

Right client the "Internet Message Formats", you can modify the MIME types used in your ORGANIZATION.

Control the "Message Formats" for Internet SMTP domain


We have three Internet SMTP Organizations: Study.COM, Delta.Com, and Contoso.com.

Study.COM and Delta.COM use EXCHANGE SERVER 2003, whereas Contoso.com uses Unix Sendmail.

All the three Organizations are partners. All of them support Message Format of HTML and Plain text.

However, Contoso.com (Unix) will never use the Rich Exchange Format.

Only the communication among three Organizations is required to have the following features:
Allow Out of Office Response
Allow Automatic Reply
Allow Automatic Forward


We create two SMTP domains: Contoso.com and Delta.com and modify the Advanced Message Format accordingly.

The default(*) SMTP domain matches all other domains.


Sunday, July 15, 2007

Creating a Address List only for a group of users, such as supervisors.


assuming you have a user account template -- supervisor--with extensionAttribute1 set to supervisor. --User account's Exchange Advanced tab.


And then, you create several user accounts (for example, Sam, Gordon, and Diana) from the supervisor template in Active Directory Users and Computers tool.


In Exchange System Manager, you create a new address list -- supervisors-- with the filter Custom Attribute 1 = supervisor, as shown.


Last, only allow the supervisors to view Supervisors address list.

Multi-location mail delivery

Delivering Internet e-mail uses the local ISP connection, whereas inter-organization e-mail delivery uses the dedicated T1 connection.

Configuration:
Routing Group Connectors are used to connect the Routing Group Vancouver and Routing Group Toronto. It accomplishes the inter-organization e-mail delivery. The connectors are set up for entire organization.
In each routing group, create a SMTP connector with a dedicated SMTP virtual server and make sure that SMTP connector has an SMTP address space of * and restrict the connector scope to the routing group.

Saturday, July 14, 2007

Open all mailboxes in a mailbox store

If you want a user Jessie to open all mailboxes in mailbox store, you grant the RECEIVE AS permission to Jessie on Mailbox Store object in Exchange System Manager.

I actually granted the following permissions to Jessie:

Read
Execute
Read Permissions
List Contents
Read Properties
List Objects
Receive AS

Jessie opens its outlook.

Jessie can open additional mailboxes in its outlook. --Jessie mailbox properties -- Advanced button.

When you grant a user has Receive As permissions to a mailbox database, that user can log in
to all mailboxes within that database, but is not able to send e-mail messages from those
mailboxes. Also, if you grant Receive As permissions at the storage group level, the
specified user can log in to all mailboxes within all databases in the storage group. For
example, you may want to grant access to the mailbox database for mobile access or for legal
review.


open only one mailbox

You grant Jessie the FULL MAILBOX ACCESS permission on the mailbox in AD.
Send on Behalf, Send AS, and DELEGATES


Mary is the sender.


The message shows that it comes from Diana. When you open it, pay attention to FROM line, "Mary on behalf of Diana".


How to set this up?


In Active Directory Users and Computers, locate the Diana user object -- properties


Find the SEND ON BEHALF permission, grant the permission to user: Mary.


Then, Mary can send messages on Diana's behalf.


Permission "Send on behalf" receiver opens OUTLOOK.

DELEGATES

User Jessie opens its OUTLOOK,
TOOLS--OPTIONS--DELEGATES--Add the user Logan to the list.


User Logan opens its outlook and create a new message with FROM selection of jessie user.

The message receiver will get the similar format of SEND ON BEHALF. The receiver sees the message comes from jessie. When the message opens, "Logan on behalf of Jessie" is shown on FROM line.

DELEGATES are used from client's point of view. There are other permissions that can be delegated.

SEND ON BEHALF is usually granted by administrator because you should use the AD tools.


Send AS permission


You create two users: VIPuser1 and VIPuser2.

VIPuser2 sends messages as VIPuser1. You work on VIPuser1 object in AD.


Permission "SEND AS" receiver opens OUTLOOK.

Step 1:

Active Directory Users and Computers --locates VIPuser1 -- Properties -- Security Tab
Assign the VIPuser2 with SEND AS permission.

Step 2:

VIPuser2 opens its outlook and displays FROM option as shown below. Click the FROM button, VIPuser2 can select the VIPuser1 as the sender.

When a receiver get the message, it sees the message comes from VIPuser1. The SEND AS permission is quite useful in customer support. For example, there are 10 customer support technicians. Each has its own e-mail address. You want all the technicians use only one e-mail address support@vip.com to provide support. The customers only send e-mail to support@vip.com.

How to achieve the goal?

Create a AllSupport security group and add all the 10 technician to the member list;
Create a distribution group: SUPPORT with alias Support@vip.com and add all the 10 technician to the member list;
Assign the AllSupport security group the SEND AS permission on SUPPORT distribution group object;

All customers send the service request messages to Support@vip.com. All technicians receive the messages. When a technician replies the message, it can select the Support@vip.com address in FROM button. The customer will see the support email come from Support@vip.com.


All three permissions' grantee must open its OUTLOOK and initiate messages and select the grantor in FROM line.

Friday, July 13, 2007

Open two or more mailboxes in Outlook

Outlook can access only one primary mailbox. The example will show you how to set up Outlook to open two mailboxes.

First, set up Outlook with VIPuser1.Smarthust@vip.com.
Second, in VIP.com domain, locate the VIPuser2.Newton user account and assign the Full Mailbox Access right to VIPUser1.Smarthust.
Third, in Outlook, right click VIPuser1.Smarthust mailbox and select properties, locate "Open these additional mailboxes". Then, you will get the similar outlook layout shown below.


Exchange server 2003

Limiting the addresses that Outlook can see


Exchange System Manager


First, remove everyone, authenticated users anonymous Logon from the following address list under the recipients:

All Contacts

All Users

All Groups

Default Global Address List


Second, create a customized address list, for example, Toupe Corporation with the following filter:


(&(objectCategory=user)(memberOf=CN=Toupegroup,OU=ToupeCorporation,DC=VIP,DC=COM))


In order for the above filter working perfectly, you must create an ToupeCorporation in VIP.COM domain and a Toupegroup group (distribution type if you include the contact in the group) in ToupeCorporation OU. And then, add all users in Toupe Corporation to the member list of Toupegroup.


Third, set up security for only users in Toupe Corporation access.


You cannot create a filter based on OU, because OU is not a attribute of a user object, contact object and group object. However, a group object has the memberOf attribute.


For the contact object filter:


(&(objectCategory=contact)(memberOf=CN=Toupegroup,OU=ToupeCorporation,DC=VIP,DC=COM))


With both contact and user object filter:


((&(objectCategory=user)(memberOf=CN=Toupegroup,OU=ToupeCorporation,DC=VIP,DC=COM))(&(objectCategory=contact)(memberOf=CN=Toupegroup,OU=ToupeCorporation,DC=VIP,DC=COM)))

-- or
& -- and

Take a look at the screenshot, you should put a pipe sign after the first (. I put it several times. It magically would take it in the blog site.


To input the filter, you must use the custom search.

Tuesday, July 10, 2007

A new email address generated and old email address kept

You have a recipient policy for all exchange organization as follows:
%g.%s@van.com.

User

FirstName: Lina
LastName: Smarthurst
DisplayName :Lina Smarthurst
FullName:Lina Smarthurst

Her email address will be Lina.Smarthurst@van.com.

Her lastname is changed to Smiths because of new marriage. She wants the new lastname will be used in her email address and her new friendly name (Lina Smiths) will appear in her outgoing e-mail address. She still receives e-mail targeted to old e-mail address.

How to achieve that?

Modify her account as follows:

LastName: Smiths
DisplayName: Lina Smiths

%g -- FirstName
%s -- LastName

Friendly Name will come from the DisplayName attribute of the account.

When the recipient policy runs, it generates a new email address based on the FirstName and LastName. Any existing email address will be kept.


However, when you open Active Directory Users and Computers, the Lina Smarthurst still shows, because the Active Directory Users and Computers Interface uses the FullName attribute of a user account. To modify the fullname, right click an account -- rename.

Monday, July 9, 2007


universal group and expansion server


a mail-enabled Universal Security Group: allToronto is created and all users of Toronto are members of the group.

The VPN between Toronto and Vancouver is constantly busy.

When users in Vancouver send e-mail to the allToronto group, some recipients receive the messages after several minutes, but other recipients receive it several hours later.

Solution:

Creating a routing group A in Toronto and a routing group in Vancouver.

Placing EXCH1, EXCH2, EXCH3 and EXCH4 in routing group A. Place EXCH5 and EXCH6 in routing group B.

Creating connectors to send messages between the two routing groups.

Reason:

When sending messages to a distribution group in one routing group configuration, the exchange server will send the message directly to individual member of the group. Microsoft recommends to create routing groups configuration between exchange servers when you have slow or unreliable link. When routing groups are created, group membership expansion will occur at the destination exchange server.


Message Tracking Center

Message Tracking Center tracks messages across exchange servers.
EXCH1 is the bridgehead server for a routing group connector to SiteB.
EXCH2 is the bridgehead server for a routing group connector to SiteC.
You use Message Tracking Center on EXCH3 to track the flow of messages sent from EXCH3 to EXCH3 at SiteC. However, you only see the progress to EXCH1. How can you track the messages reaching the EXCH4 at SITEC?
Solution:
Enable the Message Tracking on Exchange Server EXCH2 and EXCH3.