I set up one Fedora 9 computer and one Fedora 8 computer. The root@test.com and root@about.com can send e-mail between them.
Fedora 9:
[root@east ~]#hostname east.test.com
east.test.com
[root@east ~]#vi /etc/sysconfig/network
NETWORKING=yes
HOSTNAME=east.test.com
[root@east ~]#vi /etc/hosts
# Do not remove the following line, or various programs
# that require network functionality will fail.
127.0.0.1 east.test.com east localhost.localdomain localhost
[root@east ~]#vi /etc/resolv.conf
nameserver 192.168.0.190
search test.com.
domain test.com
=======
named daemon
[root@east ~]#vi /etc/named.conf
options {
allow-query {
any;
localhost;
};
forwarders { 192.168.0.1 port 53;
};
listen-on port 53 { 127.0.0.1;192.168.0.190; };
listen-on-v6 port 53 { ::1; };
directory "/var/named";
dump-file "/var/named/data/cache_dump.db";
statistics-file "/var/named/data/named_stats.txt";
memstatistics-file "/var/named/data/named_mem_stats.txt";
recursion yes;
};
logging {
channel default_debug {
file "data/named.run";
severity dynamic;
};
};
zone "about.com." IN {
type master;
file "about.com.db";
};
zone "0.168.192.IN-ADDR.ARPA." IN {
type master;
file "192.168.0.db";
};
zone "test.com." IN {
type master;
file "test.com.db";
};
zone "." IN {
type hint;
file "named.ca";
};
include "/etc/named.rfc1912.zones";
[root@east ~]#vi /var/named/chroot/var/named/test.com.db
$TTL 1H
@ SOA east root.east.test.com. ( 7
3H
1H
1W
1H )
NS east
IN 1H MX 0 east
east IN 1H A 192.168.0.190
[root@east ~]#vi /var/named/chroot/var/named/about.com.db
$TTL 1H
@ SOA east.test.com. root.east.test.com. ( 2
3H
1H
1W
1H )
IN 1H MX 0 west
NS east.test.com.
west IN 1H A 192.168.0.105
[root@east ~]#chkconfig --level 35 named on
[root@east ~]#service named start
[root@east ~]#
[root@east ~]# nslookup east
Server: 192.168.0.190
Address: 192.168.0.190#53
Name: east.test.com
Address: 192.168.0.190
[root@east ~]#vi /etc/mail/local-host-names
# local-host-names - include all aliases for your machine here.
east.test.com east
-------
sendmail configuration
[root@east ~]#vi /etc/mail/sendmail.mc
dnl DAEMON_OPTIONS(`Port=smtp,Addr=127.0.0.1, Name=MTA')dnl DAEMON_OPTIONS(`Port=smtp,Addr=0.0.0.0, Name=MTA')dnl
dnl DAEMON_OPTIONS(`Port=smtp,Addr=192.168.0.20, Name=MTA')dnl
dnl LOCAL_DOMAIN(`localhost.localdomain')dnl
LOCAL_DOMAIN(`test.com')dnl
dnl #
[root@east ~]# m4 /etc/mail/sendmail.mc > /etc/mail/sendmail.cf
[root@east ~]# service sendmail restart
Shutting down sm-client: [ OK ]
Shutting down sendmail: [ OK ]
Starting sendmail: [ OK ]
Starting sm-client: [ OK ]
[root@east ~]# netstat -nl grep :25 grep tcp
tcp 0 0 0.0.0.0:25 0.0.0.0:* LISTEN
[root@east ~]#
========
Configuring the Evolution softwae
Gnome--Applications --Office --Evolution Mail and Calendar
Identity:
Email Address: root@east.test.com
Receiving Mail:
Server Type: Standard Unix mbox spool file
Configuration:
Path:/var/spool/mail/root
Sending Mail: sendmail
If the SEND/RECEIVE button of your evolution software is dimmed, you could click on the lower right button to turn it online.
==
Fedora 8:
[root@west ~]#hostname west.about.com
/etc/hosts
# Do not remove the following line, or various programs
# that require network functionality will fail.
127.0.0.1 west.about.com localhost.localdomain localhost
/etc/resolv.conf
; generated by /sbin/dhclient-script
domain test.com
search test.com.
#nameserver 192.168.0.1
nameserver 192.168.0.190
/etc/sysconfig/network
NETWORKING=yes
HOSTNAME=west.about.com
/etc/mail/local-host-names
# local-host-names - include all aliases for your machine here.
west.about.com
/etc/mail/sendmail.mc
dnl #
dnl DAEMON_OPTIONS(`Port=smtp,Addr=127.0.0.1, Name=MTA')dnl
DAEMON_OPTIONS(`Port=smtp,Addr=0.0.0.0, Name=MTA')dnl
dnl #
dnl #
LOCAL_DOMAIN(`about.com')dnl
dnl #
[root@west ~]# m4 /etc/mail/sendmail.mc > /etc/mail/sendmail.cf
[root@west ~]# service sendmail restart
lastly, set up the evolution mail software with root@about.com. I use the server type: Standard Unix Mbox spool file and Path is /var/spool/mail/root
[root@west ~]# set grep MAIL
MAIL=/var/spool/mail/root
MAILCHECK=60
[root@west ~]#
Sending e-mail
Server Type: sendmail
=======
I repeated the configuration with Fedora 9 and Fedora 9. As long as you open 53/tcp and 25/tcp ports on your firewall, two computers can SEND/RECEIVE mail.
Showing posts with label Fedora. Show all posts
Showing posts with label Fedora. Show all posts
Friday, May 23, 2008
Monday, May 19, 2008
Fedora8:Apache set up--httpd.conf
/etc/httpd/conf/httpd.conf
Assuming the DNS is set up. My Fedora computer can be resolved as west.test.com.

ServerName west.test.com:80
Where should you place all web pages?
DocumentRoot "/var/www/html"
By default, Apache searches the DocumentRoot directory for index.html.
If you have a default.htm file as your home page, you could create a symbolic link as follows:
[root@west html]#ln -s default.htm index.html
====
Allow a regular user (e.g. developer) to upload web pages by ftp
useradd -d /var/www/html -g users developer
Allow everyone, including the httpd daemon, read the content of /var/www/html.
Set owner and its primary group to developer and users
[root@west ~]#chown -R developer:users /var/www/html
[root@west ~]#chmod 755 /var/www/html
====
PERL and PHP languages can be used to create CGI Scripts, which generate new Web page output or update data files, etc.
/etc/httpd/conf/httpd.conf
#
# ScriptAlias: This controls which directories contain server scripts.
# ScriptAliases are essentially the same as Aliases, except that
# documents in the realname directory are treated as applications and
# run by the server when requested rather than as documents sent to the client.
# The same rules about trailing "/" apply to ScriptAlias directives as to
# Alias.
#
ScriptAlias /cgi-bin/ "/var/www/cgi-bin/"
Assuming the DNS is set up. My Fedora computer can be resolved as west.test.com.

ServerName west.test.com:80
Where should you place all web pages?
DocumentRoot "/var/www/html"
By default, Apache searches the DocumentRoot directory for index.html.
If you have a default.htm file as your home page, you could create a symbolic link as follows:
[root@west html]#ln -s default.htm index.html
====
Allow a regular user (e.g. developer) to upload web pages by ftp
useradd -d /var/www/html -g users developer
Allow everyone, including the httpd daemon, read the content of /var/www/html.
Set owner and its primary group to developer and users
[root@west ~]#chown -R developer:users /var/www/html
[root@west ~]#chmod 755 /var/www/html
====
CGI Scripts
PERL and PHP languages can be used to create CGI Scripts, which generate new Web page output or update data files, etc.
/etc/httpd/conf/httpd.conf
#
# ScriptAlias: This controls which directories contain server scripts.
# ScriptAliases are essentially the same as Aliases, except that
# documents in the realname directory are treated as applications and
# run by the server when requested rather than as documents sent to the client.
# The same rules about trailing "/" apply to ScriptAlias directives as to
# Alias.
#
ScriptAlias /cgi-bin/ "/var/www/cgi-bin/"
[root@test ~]# mkdir /var/www/cgi-bin/test
[root@test ~]#  chcon -h -t httpd_sys_script_exec_t /var/www/cgi-bin/
[root@test ~]# ls -Z /home/www/cgi-bin
drwxr-xr-x  root     root     root:object_r:httpd_sys_script_exec_t test
[root@test ~]# vi /home/www/cgi-bin/test/test.cgi
[root@test ~]#  chmod o+x /home/www/cgi-bin/test/test.cgi


Sunday, May 18, 2008
Fedora8: FTP
FTP is easy to set up.
Just install the package.
Firewall configuration: allow DNS and FTP pass through.
system-config-selinux to turn off SELinux if you allow clients to upload files.
chkconfig --level 35 on
/etc/vsftpd/vsftpd.conf
anonymous_enable=YES
listen=YES
service vsftpd start
You can access your FTP server.
=====
default ftp root
anon_root=/var/ftp/
Default ftp user
ftp_username=ftp
===
/etc/vsftpd/vsftpd.conf
# Allow anonymous FTP? (Beware - allowed by default if you comment this out).
anonymous_enable=YES
#
# Uncomment this to allow local users to log in.
local_enable=YES
#
# Uncomment this to enable any form of FTP write command.
write_enable=YES
#
# Default umask for local users is 077. You may wish to change this to 022,
# if your users expect that (022 is used by most other ftpd's)
local_umask=022
#
# Uncomment this to allow the anonymous FTP user to upload files. This only
# has an effect if the above global write enable is activated. Also, you will
# obviously need to create a directory writable by the FTP user.
ascii_upload_enable=YES anon_upload_enable=YES
===
You must enable both ascii_upload_enable=YES and anon_upload_enable=YES. If you don't, unrecognised variable anon_upload_enable message shows.
====
Test
mkdir /var/ftp/pub/upload
chmod o+rw /var/ftp/pub/upload
At any ftp client:
ftp mylinux.test.com ftp>cd pub/upload
ftp>put /etc/resolv.conf resolv.conf
===
# Uncomment this if you want the anonymous FTP user to be able to create
# new directories.
anon_mkdir_write_enable=YES
============
Active FTP

Tools--Internet Options-- Advanced -- unckeck Enable folder view for FTP sites -- Check Use Passive FTP
IIS
Just install the package.
Firewall configuration: allow
 DNS and FTP pass through.
system-config-selinux to turn off SELinux if you allow clients to upload files.
chkconfig --level 35 on
/etc/vsftpd/vsftpd.conf
anonymous_enable=YES
listen=YES
service vsftpd start
You can access your FTP server.
=====
default ftp root
anon_root=/var/ftp/
Default ftp user
ftp_username=ftp
===
/etc/vsftpd/vsftpd.conf
# Allow anonymous FTP? (Beware - allowed by default if you comment this out).
anonymous_enable=YES
#
# Uncomment this to allow local users to log in.
local_enable=YES
#
# Uncomment this to enable any form of FTP write command.
write_enable=YES
#
# Default umask for local users is 077. You may wish to change this to 022,
# if your users expect that (022 is used by most other ftpd's)
local_umask=022
#
# Uncomment this to allow the anonymous FTP user to upload files. This only
# has an effect if the above global write enable is activated. Also, you will
# obviously need to create a directory writable by the FTP user.
ascii_upload_enable=YES anon_upload_enable=YES
===
You must enable both ascii_upload_enable=YES and anon_upload_enable=YES. If you don't, unrecognised variable anon_upload_enable message shows.
====
Test
mkdir /var/ftp/pub/upload
chmod o+rw /var/ftp/pub/upload
At any ftp client:
ftp mylinux.test.com
 ftp>cd pub/upload
ftp>put /etc/resolv.conf resolv.conf
===
# Uncomment this if you want the anonymous FTP user to be able to create
# new directories.
anon_mkdir_write_enable=YES
============
Active FTP
- Client connects to the FTP server by establishing an FTP control connection to port 21 of the server. The commands, such as 'ls' and 'get', are sent over this connection.
- Whenever the client requests data over the control connection, the server initiates data transfer connections back to the client. The server port is always 20, and the client(destination) port is a high port (greater than 1024).
Active FTP may fail. By default, the firewall blocks any traffic initiates from outside. It is very hard to configure the firewall to suit the case because you don't know which port to open.
Passive FTP
Passive FTP works differently:
- Client connects to the FTP server on port 21 of the server. Your commands such as ls and get are sent over that connection.
- Whenever the client requests data over the control connection, the client initiates the data transfer connections to the server. Client (port >1023) initiates data connection to random port (>1023) specified by server
Passive FTP should be viewed as the server never making an active attempt to connect to the client for FTP data transfers. Because client always initiates the required connections, passive FTP works better for clients protected by a firewall.
As Windows defaults to active FTP, and Linux defaults to passive,
FTP is a TCP based service exclusively.Active FTP :
command : client >1023 -> server 21
data : client >1023 <- server 20
Passive FTP :
command : client >1023 -> server 21Enable passive FTP on Internet Explorer
data : client >1023 -> server >1023
Tools--Internet Options-- Advanced -- unckeck Enable folder view for FTP sites -- Check Use Passive FTP
IIS
Setting the Passive Connection Port Range
FTP clients connect to FTP servers through a well-known service port, TCP port 21, and establish a control channel for sending requests and receiving replies. For actual file data transfers, a second connection is established: a data channel. By default, the server connects back to the client to establish the data connection, which is an active-mode connection. However, to support clients that are behind firewalls and cannot accept incoming connections, the FTP protocol allows the client to connect to the server to establish the data channel, which is a passive-mode connection. Passive-mode connections are established through the following process: the client requests a passive mode (PASV), the server replies with a unique port number, and the client connects to that port.
By default, the FTP server allocates ports for passive-mode connections from the WinSock dynamic range, 1024 to 5000. If the server itself is behind a firewall, the 1024 to 5000 port range must be open for incoming connections at the firewall. This requirement can expose the server to potential attack because many applications share the WinSock dynamic port range. To reduce the attack surface, you can configure the FTP service to allocate ports for passive-mode connections from a port range above 5000, which allows you to assign a port range to be used exclusively by FTP passive-mode connections and to create firewall and router policies that open that range for incoming TCP connections.
To set the port range for passive-mode connections, edit the PassivePortRange property in the metabase. When you set the port range, consider the number of anticipated concurrent file transfers because each client might need a distinct port. For performance reasons, the port range should be at least two times the number of anticipated concurrent file transfers.
Windows command line:
adsutil.vbs set /MSFTPSVC/PassivePortRange "5200-5600"
Your server side firewall must have all the ports between 5200-5600 open.
Friday, May 16, 2008
Fedora8:DHCP
download package: http://rpmfind.net/linux/rpm2html/search.php?query=gdhcpd
gdhcpd-0.3.2-6.fc8.i386.rpm
gdhcpd-0.3.2-8.fc9.i386.rpm
If you run "service dhcpd start" command, you will get the message "failed".
 Open "/etc/dhcpd.conf"
#
# DHCP Server Configuration file.
# see /usr/share/doc/dhcp*/dhcpd.conf.sample
#
cp the content of the dhcpd.conf sample to /etc/dhcpd.conf and save /etc/dhcpd.conf.
service dhcpd start [OK]
The following is the sample file. I only care the 3 things:
default gateway
dynamic range
name server
ddns-update-style interim;
ddns-updates off;
ignore client-updates;
one-lease-per-client false;
allow bootp;
option T150 code 150 = string;
#
# DHCP Server Configuration file.
# see /usr/share/doc/dhcp*/dhcpd.conf.sample
#
subnet 192.168.0.0 netmask 255.255.255.0 {
# --- default gateway
option routers 192.168.0.1;
option subnet-mask 255.255.255.0;
option nis-domain "domain.org";
option domain-name "domain.org";
option domain-name-servers 192.168.1.1;
option time-offset -18000; # Eastern Standard Time
# option ntp-servers 192.168.1.1;
# option netbios-name-servers 192.168.1.1;
# --- Selects point-to-point node (default is hybrid). Don't change this unless
# -- you understand Netbios very well
# option netbios-node-type 2;
range dynamic-bootp 192.168.0.128 192.168.0.190;
default-lease-time 21600;
max-lease-time 43200;
# we want the nameserver to appear at a fixed address
host ns {
next-server marvin.redhat.com;
hardware ethernet 12:34:56:78:AB:CD;
fixed-address 207.175.42.254;
}
}
gdhcpd-0.3.2-6.fc8.i386.rpm
gdhcpd-0.3.2-8.fc9.i386.rpm
If you run "service dhcpd start" command, you will get the message "failed".
 Open "/etc/dhcpd.conf"
#
# DHCP Server Configuration file.
# see /usr/share/doc/dhcp*/dhcpd.conf.sample
#
cp the content of the dhcpd.conf sample to /etc/dhcpd.conf and save /etc/dhcpd.conf.
service dhcpd start [OK]
The following is the sample file. I only care the 3 things:
default gateway
dynamic range
name server
ddns-update-style interim;
ddns-updates off;
ignore client-updates;
one-lease-per-client false;
allow bootp;
option T150 code 150 = string;
#
# DHCP Server Configuration file.
# see /usr/share/doc/dhcp*/dhcpd.conf.sample
#
subnet 192.168.0.0 netmask 255.255.255.0 {
# --- default gateway
option routers 192.168.0.1;
option subnet-mask 255.255.255.0;
option nis-domain "domain.org";
option domain-name "domain.org";
option domain-name-servers 192.168.1.1;
option time-offset -18000; # Eastern Standard Time
# option ntp-servers 192.168.1.1;
# option netbios-name-servers 192.168.1.1;
# --- Selects point-to-point node (default is hybrid). Don't change this unless
# -- you understand Netbios very well
# option netbios-node-type 2;
range dynamic-bootp 192.168.0.128 192.168.0.190;
default-lease-time 21600;
max-lease-time 43200;
# we want the nameserver to appear at a fixed address
host ns {
next-server marvin.redhat.com;
hardware ethernet 12:34:56:78:AB:CD;
fixed-address 207.175.42.254;
}
}
Fedora8: NIC default gateway
route add default gw 15.168.35.240
 As shown above, run the command route
Destination: default
Gateway: van-student
van-student hostname is defined in /etc/hosts
NIC's DNS server option is defined in /etc/resolv.conf.
By default, the computer will search for /etc/hosts for name resolution. And then, the DNS server resolution.
/etc/host.conf file controls the name resolution order.
cat /etc/host.conf
order hosts, bind
If you modify /etc/host.conf file as:
order bind, hosts
The name resolution order will be DNS first, and then /etc/hosts file.
==========
http://www.isc.org/index.pl?/sw/dhcp/
download dhcp-4.1.0a1.tar.gz
 As shown above, run the command route
Destination: default
Gateway: van-student
van-student hostname is defined in /etc/hosts
NIC's DNS server option is defined in /etc/resolv.conf.
By default, the computer will search for /etc/hosts for name resolution. And then, the DNS server resolution.
/etc/host.conf file controls the name resolution order.
cat /etc/host.conf
order hosts, bind
If you modify /etc/host.conf file as:
order bind, hosts
The name resolution order will be DNS first, and then /etc/hosts file.
==========
http://www.isc.org/index.pl?/sw/dhcp/
download dhcp-4.1.0a1.tar.gz
Thursday, May 15, 2008
Fedora8:DNS-named
download the system-config-bind rpm package and install it.
vi /etc/named.conf
acl corpnets { 15.0.0.0/8; 192.168.0.0/24; };
options {
allow-query { localhost; corpnets;
};
listen-on port 53 { 127.0.0.1;15.100.100.5; };
listen-on-v6 port 53 { ::1; };
directory "/var/named";
dump-file "/var/named/data/cache_dump.db";
statistics-file "/var/named/data/named_stats.txt";
memstatistics-file "/var/named/data/named_mem_stats.txt";
recursion yes;
};
=======
create a zone: test.com
=======
/etc/named.conf
I use the system-config-bind utility.
zone "test.com." IN {
type master;
file "test.com.db";
};
====
From /var/named/chroot/var/named directory, you will find the test.com.db file. This file includes all the records.
====
create some A records by system-config-bind

 /var/named/chroot/var/named/test.com.db
http://www.bind9.net/manuals
/etc/named.conf
I have two networks:15.0.0.0/8 and 192.168.0.0/24. I define the corpnets, which queries will be allowed.
The Fedora computer with named service installed has the IP address 15.100.100.5. So I include the 15.100.100.5 in the listen-on port 53 { 127.0.0.1; 15.100.100.5; }. If I include the 192.168.35.0/24 network, I should add IP address to listen-port. Pay attention to allow-query. It includes the corpnets, which I defined.
/etc/named.conf
I have two networks:15.0.0.0/8 and 192.168.0.0/24. I define the corpnets, which queries will be allowed.
The Fedora computer with named service installed has the IP address 15.100.100.5. So I include the 15.100.100.5 in the listen-on port 53 { 127.0.0.1; 15.100.100.5; }. If I include the 192.168.35.0/24 network, I should add IP address to listen-port. Pay attention to allow-query. It includes the corpnets, which I defined.
vi /etc/named.conf
acl corpnets { 15.0.0.0/8; 192.168.0.0/24; };
options {
allow-query { localhost; corpnets;
};
listen-on port 53 { 127.0.0.1;15.100.100.5; };
listen-on-v6 port 53 { ::1; };
directory "/var/named";
dump-file "/var/named/data/cache_dump.db";
statistics-file "/var/named/data/named_stats.txt";
memstatistics-file "/var/named/data/named_mem_stats.txt";
recursion yes;
};
=======
create a zone: test.com
=======
/etc/named.conf
I use the system-config-bind utility.
zone "test.com." IN {
type master;
file "test.com.db";
};
====
From /var/named/chroot/var/named directory, you will find the test.com.db file. This file includes all the records.
====
create some A records by system-config-bind
 /var/named/chroot/var/named/test.com.db
 edit /etc/resolv.conf file to use the newly-configured dns server.
search test.com.
nameserver 15.100.100.5
====
start named service:
service named start
test the dns server:
nslookup west =====
=====
I have a DNS server 15.168.35.228, which connects to Internet.
acl corpnets {
192.168.0.0/24;
15.0.0.0/8;
};
options {
forwarders { 15.168.35.228 port 53;};
allow-query {
localhost;
localnets;
corpnets;
};
listen-on port 53 { 127.0.0.1;15.100.100.5; };
listen-on-v6 port 53 { ::1; };
directory "/var/named";
dump-file "/var/named/data/cache_dump.db";
statistics-file "/var/named/data/named_stats.txt";
memstatistics-file "/var/named/data/named_mem_stats.txt";
recursion yes;
};
Fedora8: mount a Windows 2003 share
Windows Server Name: van-student
Shared Folder Name: networking
Fedora
mkdir /networking
mount -t cifs //van-student/networking -o user=administrator
or,
mount -t cifs //van-student/networking -o user=administrator -o password=password
Shared Folder Name: networking
Fedora
mkdir /networking
mount -t cifs //van-student/networking -o user=administrator
or,
mount -t cifs //van-student/networking -o user=administrator -o password=password
Wednesday, May 14, 2008
Fedora8:Samba sharing--Linux and Windows
Install the samba software
If your DVD does not mount automatically, add a line in /etc/fstab file.
If your DVD does not mount automatically, add a line in /etc/fstab file.
/dev/dvd /media/dvd auto defaults 0 0
mkdir /media/dvd
mount /media/dvd
cd /media/dvd/Packages
yum --nogpgcheck localinstall samba-*
chkconfig --level 35 smb on
service smb start
======
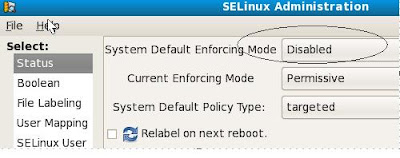
Disable SELinux unless you know how to configure it.system-config-selinux
Allow samba pass through firewall

Linux hostname:west
My windows domain: vanstudents.com
create a directory in linux:
mkdir /projects
chmod o+w /projects
create a user account:
useradd administrator
passwd administrator
add the user:administrator to root group:
useradd -G root administrator
edit the /etc/samba/smb.conf file:
[global]
[global]
workgroup = vanstudents.com
net bios name =west
[share definitions]
 edit the samba user and window user mapping
/etc/samba/smbusers
Left side is linux users; right side is windows users.
 create samba password for the linux users: I prefer to use the same password for Windows and Linux.
smbpasswd -a administrator
smbpasswd -a root
smbpasswd -a kaiming
restart samba service:
service smb restart
=======
At Windows XP machine, which is a member of vanstudents.com domain.
edit the %systemroot%\system32\drivers\etc\lmhosts
15.100.100.5 west
Ping west --successfully
search for computer: west
You should open the shared folder \\\west\projects\
From Vista:
NET USE * \\\west\projects\ password /user:administrator
=======
connect to Windows Share
Windows Server name: van-student
Share name:students
User name: vancouver
Password: password
edit /etc/samba/lmhosts file
15.168.35.240 van-student
ping van-student ---success
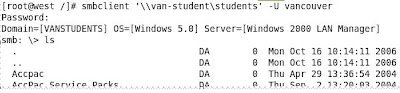
smbclient -L '\\van-student\'
smbclient '\\van-student\students\ -U vancouver
Tuesday, May 13, 2008
Fedora8:NFS sharing -Linux to Linux
Computer1:
Fedora 8 installed
Host Name:west
IP address: 15.100.100.5/8
/etc/hosts
15.100.100.5 west
15.200.200.26 mylinux
Computer2:
Fedora 7 installed
Host Name: mylinux
IP address: 15.200.200.26/8
/etc/hosts
15.100.100.5 west
15.200.200.26 mylinux
Computer1:
Add the following lines to /etc/sysconfig/nfs
STATD_PORT=4001
LOCKD_TCPPORT=4002
LOCKD_UDPPORT=4002
MOUNTD_PORT=4003
Append the following two lines to /etc/services
rquotad 4004/tcp # rpc.rquotad tcp port
rquotad 4004/udp # rpc.rquotad udp port
Restart the nfs services
/etc/init.d/nfs restart
/etc/init.d/nfslock restart
/usr/sbin/rpcinfo -p
 As shown, the portmapper,nfs,rquotad,nlockmgr, and mountd are started.
Fedora 8 installed
Host Name:west
IP address: 15.100.100.5/8
/etc/hosts
15.100.100.5 west
15.200.200.26 mylinux
Computer2:
Fedora 7 installed
Host Name: mylinux
IP address: 15.200.200.26/8
/etc/hosts
15.100.100.5 west
15.200.200.26 mylinux
Computer1:
Add the following lines to /etc/sysconfig/nfs
STATD_PORT=4001
LOCKD_TCPPORT=4002
LOCKD_UDPPORT=4002
MOUNTD_PORT=4003
Append the following two lines to /etc/services
rquotad 4004/tcp # rpc.rquotad tcp port
rquotad 4004/udp # rpc.rquotad udp port
Restart the nfs services
/etc/init.d/nfs restart
/etc/init.d/nfslock restart
/usr/sbin/rpcinfo -p
As shown, the portmapper,nfs,rquotad,nlockmgr, and mountd are started. configure the Linux firewall to open the following ports:
111/tcp, 111/udp,4004/tcp,4004/udp,4003/tcp,4003/udp, 4002/tcp,4002/udp, 2049/tcp and 2049/udp.
mkdir /projects
mkdir /tests
/etc/exports
/projects mylinux(rw)
/tests mylinux(ro)
exportfs
computer2:
mkdir /projects.home
mkdir /tests.home
mount west:/projects /projects.home
mount west:/tests /tests.home
Fedora8: Cups printing
SMB printing
Fedora 8 connects to printer configured on Windows server 2000.

Windows 2000 server VAN-STUDENT has created a printer pointing to HP LaserJet 4050 (192.168.35.231).

gnome
System-Administration-Printing
 Click the Verify button and make sure that printer share is accessible.
======
Windows XP/Vista print documents to a printer created on Fedora.
Access the CUPS administration site and find out the printer name in Fedora.
http://15.200.200.26:631/printers

XP/Vista
Add a printer with http://15.200.200.26:631/printers/LaserJet_4050
Then, XP/Vista can print documents through Fedora.
Fedora 8 connects to printer configured on Windows server 2000.
Windows 2000 server VAN-STUDENT has created a printer pointing to HP LaserJet 4050 (192.168.35.231).
Fedora 8:
vi /etc/hosts
van-student 15.168.35.240
ping van-student
gnome
System-Administration-Printing
Click the Verify button and make sure that printer share is accessible.======
Windows XP/Vista print documents to a printer created on Fedora.
Access the CUPS administration site and find out the printer name in Fedora.
http://15.200.200.26:631/printers
XP/Vista
Add a printer with http://15.200.200.26:631/printers/LaserJet_4050
Then, XP/Vista can print documents through Fedora.
Sunday, May 11, 2008
Fedora7:Firewall or iptables
The iptables filter table composes three chains: INPUT, FORWARD, and OUTPUT. Most of the time, we configure the INPUT chain.
 As shown, the Fedora defines a RH-Firewall-1-INPUT chain. The iptables -A INPUT command will be at the end of INPUT chain as shown:
[root@mylinux ~]# iptables -A INPUT -p tcp --dport 444 -j ACCEPT
 [root@mylinux ~]# cat /etc/services | grep 444
snpp 444/tcp # Simple Network Paging Protocol
snpp 444/udp # Simple Network Paging Protocol
The newly-defined filter record will never be executed because INPUT will redirect all the filtering action to RH-Firewall-1-INPUT chain. You should add the filter record to RH-Firewall-1-INPUT chain.
[root@mylinux ~]# iptables -A RH-Firewall-1-INPUT -p tcp --dport 444 -j ACCEPT
Or, You should use the INSERT option.
Chain INPUT (policy ACCEPT)
target prot opt source destination
ACCEPT udp -- anywhere anywhere udp dpt:snpp
RH-Firewall-1-INPUT 0 -- anywhere anywhere
ACCEPT tcp -- anywhere anywhere tcp dpt:snpp
Remember to run iptables-save command. If you forget running iptables-save, the newly-defined records will be lost when you restart your system.
 Why? I define a port under "Other ports". I close the Security Level Configuration window. When I open it again, the definition is not there. iptables -L does not report the open port.???
Solution:
After you define a ports, e.g. 5900-5905/tcp, I double-click on one of the Trusted services, e.g. FTP and click button Apply.
The above popup box shows. Click Yes button. In terminal window, run iptables-save command. Then, click OK button on Security Level Configuration window. The configuration is saved.
The /etc/services file has many definitions. When you run iptables -L command, the some port numbers will be replaced with the names, such as 444/udp will be replaced with dpt:snpp.
 As shown, the Fedora defines a RH-Firewall-1-INPUT chain. The iptables -A INPUT command will be at the end of INPUT chain as shown:
[root@mylinux ~]# iptables -A INPUT -p tcp --dport 444 -j ACCEPT
 [root@mylinux ~]# cat /etc/services | grep 444
snpp 444/tcp # Simple Network Paging Protocol
snpp 444/udp # Simple Network Paging Protocol
The newly-defined filter record will never be executed because INPUT will redirect all the filtering action to RH-Firewall-1-INPUT chain. You should add the filter record to RH-Firewall-1-INPUT chain.
[root@mylinux ~]# iptables -A RH-Firewall-1-INPUT -p tcp --dport 444 -j ACCEPT
Or, You should use the INSERT option.
Chain INPUT (policy ACCEPT)
target prot opt source destination
ACCEPT udp -- anywhere anywhere udp dpt:snpp
RH-Firewall-1-INPUT 0 -- anywhere anywhere
ACCEPT tcp -- anywhere anywhere tcp dpt:snpp
Remember to run iptables-save command. If you forget running iptables-save, the newly-defined records will be lost when you restart your system.
 Why? I define a port under "Other ports". I close the Security Level Configuration window. When I open it again, the definition is not there. iptables -L does not report the open port.???
Solution:
After you define a ports, e.g. 5900-5905/tcp, I double-click on one of the Trusted services, e.g. FTP and click button Apply.

The above popup box shows. Click Yes button. In terminal window, run iptables-save command. Then, click OK button on Security Level Configuration window. The configuration is saved.
The /etc/services file has many definitions. When you run iptables -L command, the some port numbers will be replaced with the names, such as 444/udp will be replaced with dpt:snpp.
Fedora7: remote desktop
Gnome Windows Environment
System--Preferences--Internet and Network --Remote Desktop

After the "Ask you for confirmation" is unchecked, I could connect the Fedora from Windows 2003 by VNC Viewer without password.
KDE krfb Desktop Sharing
System Tools --krfb Desktop Sharing Click on Configure... button
 Uncheck "Confirm uninvited connections before accepting
Check "Allow uninvited connections to control the desktop"
By vncviewer downloaded from http://www.realvnc.com, I could connect to my Fedora without authentication.
System--Preferences--Internet and Network --Remote Desktop

After the "Ask you for confirmation" is unchecked, I could connect the Fedora from Windows 2003 by VNC Viewer without password.
KDE krfb Desktop Sharing
System Tools --krfb Desktop Sharing
 Click on Configure... button
 Uncheck "Confirm uninvited connections before accepting
Check "Allow uninvited connections to control the desktop"
By vncviewer downloaded from http://www.realvnc.com, I could connect to my Fedora without authentication.
Saturday, May 10, 2008
Fedora7:VNC--Virtual Network Computing
Network Layout:
1>Install VNC and VNC Server
service vncserver start
===
open ports for vncviewer
Modify the iptables chain: RH-Firewall-1-INPUT
[root@mylinux ~]# iptables -L
Chain INPUT (policy ACCEPT)
target prot opt source destination
RH-Firewall-1-INPUT 0 -- anywhere anywhere
Chain FORWARD (policy ACCEPT)
target prot opt source destination
REJECT 0 -- anywhere anywhere reject-with icmp-host-prohibited
Chain OUTPUT (policy ACCEPT)
target prot opt source destination
Chain RH-Firewall-1-INPUT (1 references)
target prot opt source destination
ACCEPT 0 -- anywhere anywhere
ACCEPT icmp -- anywhere anywhere icmp any
So you should modify the chain RH-Firewall-1-INPUT.
[root@mylinux ~]# iptables -I RH-Firewall-1-INPUT -p tcp --dport 5900:5904 -j ACCEPT
The -I option means INSERT. Because there is no rulenumber specified, it is inserted at the top of the chain.
[root@mylinux ~]#iptables -L
Chain RH-Firewall-1-INPUT (1 references)
target prot opt source destination
ACCEPT tcp -- anywhere anywhere tcp dpts:5900:5904
ACCEPT 0 -- anywhere anywhere
ACCEPT icmp -- anywhere anywhere icmp any
If you want to delete the rule, you type:
[root@mylinux ~]# iptables -D RH-Firewall-1-INPUT -p tcp --dport 5900:5904 -j ACCEPT
[root@mylinux ~]#iptables-save
===
At Windows 2003 server:
download and install the VNC viewer from http://www.realvnc.com/
you can connect to the vnc terminal.


1>Install VNC and VNC Server

2>=======
logon as root
[root@mylinux ~]# vncpasswd
Password:
Verify:
[root@mylinux ~]# useradd tiger
[root@mylinux ~]# useradd lion
[root@mylinux ~]#passwd tiger
[root@mylinux ~]#passwd lion
=============
logon as tiger
[tiger@mylinux ~]$ vncpasswd
Password:
Verify:
[tiger@mylinux ~]$
===
logon as lion
[lion@mylinux ~]$ vncpasswd
Password:
Verify:
[lion@mylinux ~]$
=====
3>define the VNC server instances in /etc/sysconfig/vncservers. These will be started by the vncserver initscript.
For multiple vnc instances /etc/sysconfig/vncservers:
VNCSERVERS="1:tiger 2:lion 3:root"
VNCSERVERARGS[1]="-geometry 800x600 -depth 16"
VNCSERVERARGS[2]="-geometry 800×600 -depth 8"
VNCSERVERARGS[3]="-geometry 1024×768 -depth 16"
These would listen on ports 5901, 5902, 5903 respectively.
The above defines a vnc server instance started as user root on display 3 and resolution and color depth. Each VNC server instance listens on port 5900 plus the display number on which the server runs. The root user VNC server instance would listen on port 5903.
chkconfig vncserver onservice vncserver start
===
open ports for vncviewer
Modify the iptables chain: RH-Firewall-1-INPUT
[root@mylinux ~]# iptables -L
Chain INPUT (policy ACCEPT)
target prot opt source destination
RH-Firewall-1-INPUT 0 -- anywhere anywhere
Chain FORWARD (policy ACCEPT)
target prot opt source destination
REJECT 0 -- anywhere anywhere reject-with icmp-host-prohibited
Chain OUTPUT (policy ACCEPT)
target prot opt source destination
Chain RH-Firewall-1-INPUT (1 references)
target prot opt source destination
ACCEPT 0 -- anywhere anywhere
ACCEPT icmp -- anywhere anywhere icmp any
So you should modify the chain RH-Firewall-1-INPUT.
[root@mylinux ~]# iptables -I RH-Firewall-1-INPUT -p tcp --dport 5900:5904 -j ACCEPT
The -I option means INSERT. Because there is no rulenumber specified, it is inserted at the top of the chain.
[root@mylinux ~]#iptables -L
Chain RH-Firewall-1-INPUT (1 references)
target prot opt source destination
ACCEPT tcp -- anywhere anywhere tcp dpts:5900:5904
ACCEPT 0 -- anywhere anywhere
ACCEPT icmp -- anywhere anywhere icmp any
If you want to delete the rule, you type:
[root@mylinux ~]# iptables -D RH-Firewall-1-INPUT -p tcp --dport 5900:5904 -j ACCEPT
[root@mylinux ~]#iptables-save
===
At Windows 2003 server:
download and install the VNC viewer from http://www.realvnc.com/
you can connect to the vnc terminal.
Wednesday, May 7, 2008
Fedora7:Open Folder in the Same Window
Gnome
Double-Click My Computer
Edit Menu--Preferences
Select "Always open in browser windows"

Double-Click My Computer
Edit Menu--Preferences
Select "Always open in browser windows"

Fedora7:Add/Remove Software --"unable to retrieve the software information"
Why can't I add/remove the software directly from DVD ROM?
You must have Internet connection.
Because the baseurl and mirrorlist point to Internet, when you add/remove software, it always contacts the Web site defined. If you does not have a direct Internet connection, "Unable to retrieve software information" error shows after a while. My network has a proxy server. I could access Internet but Add/Remove Software cannot access it.
How can I install the software from my DVD?
Take a look at the /etc/yum/repos.d
fedora-development.repo
fedora-updates.repo
fedora.repo
fedora-updates-testing.repo
The fedora.repo file controls the installation. Open it:
[fedora]
name=Fedora $releasever - $basearch
#baseurl=http://download.fedora.redhat.com/pub/fedora/linux/releases/$releasever/Everything/$basearch/os/
mirrorlist=http://mirrors.fedoraproject.org/mirrorlist?repo=fedora-$releasever&arch=$basearch
enabled=1
gpgcheck=1
gpgkey=file:///etc/pki/rpm-gpg/RPM-GPG-KEY-fedora file:///etc/pki/rpm-gpg/RPM-GPG-KEY
[fedora-debuginfo]
name=Fedora $releasever - $basearch - Debug
#baseurl=http://download.fedora.redhat.com/pub/fedora/linux/releases/$releasever/Everything/$basearch/debug/
mirrorlist=http://mirrors.fedoraproject.org/mirrorlist?repo=fedora-debug-$releasever&arch=$basearch
enabled=0
gpgcheck=1
gpgkey=file:///etc/pki/rpm-gpg/RPM-GPG-KEY-fedora file:///etc/pki/rpm-gpg/RPM-GPG-KEY
=========
To install the packages from DVD directly, you must run this step--With directly Internet connection, run Add/Remove Software. It will download something from Fedora site.
And then,
modify one line as shown below:
[fedora]
name=Fedora $releasever - $basearch
#baseurl=http://download.fedora.redhat.com/pub/fedora/linux/releases/$releasever/Everything/$basearch/os/
mirrorlist=http://mirrors.fedoraproject.org/mirrorlist?repo=fedora-$releasever&arch=$basearch
baseurl=file:///media/Fedora%207%20i386%20DVD/
enabled=1
gpgcheck=1
gpgkey=file:///etc/pki/rpm-gpg/RPM-GPG-KEY-fedora file:///etc/pki/rpm-gpg/RPM-GPG-KEY
[fedora-debuginfo]
name=Fedora $releasever - $basearch - Debug
#baseurl=http://download.fedora.redhat.com/pub/fedora/linux/releases/$releasever/Everything/$basearch/debug/
mirrorlist=http://mirrors.fedoraproject.org/mirrorlist?repo=fedora-debug-$releasever&arch=$basearch
enabled=0
gpgcheck=1
gpgkey=file:///etc/pki/rpm-gpg/RPM-GPG-KEY-fedora file:///etc/pki/rpm-gpg/RPM-GPG-KEY
modify the fedora-updates.repo file
[updates]
name=Fedora $releasever - $basearch - Updates
#baseurl=http://download.fedora.redhat.com/pub/fedora/linux/updates/$releasever/$basearch/
mirrorlist=http://mirrors.fedoraproject.org/mirrorlist?repo=updates-released-f$releasever&arch=$basearch
enabled=0
gpgcheck=1
gpgkey=file:///etc/pki/rpm-gpg/RPM-GPG-KEY-fedora
It took me a while to figure it out. Because of the space in the DVD name, it gave me a lot of trouble. I use the web browser to find out the name syntax. FireFox --File --open a file--locate the DVD
From the address shown on the address bar, I found the path to DVD.
My network has a proxy server. I must modify the yum configuration file /etc/yum.conf.
[main]
cachedir=/var/cache/yum
keepcache=1
debuglevel=2
logfile=/var/log/yum.log
exactarch=1
obsoletes=1
gpgcheck=1
plugins=1
metadata_expire=1800
proxy=http://15.168.35.240:80
You must see the following: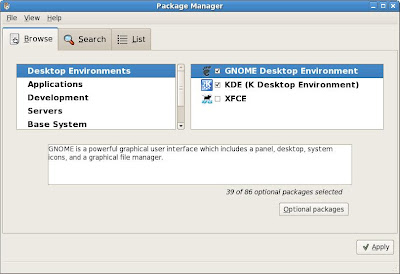
When the XFCE is in the list, Add/Remove Software can install the packages from DVD directly even I unplug the network cable.
===
If you don't want the long DVD name, complete the 3 steps:
1.
mkdir /media/dvd
2. /etc/fstab
/dev/VolGroup00/LogVol00 / ext3 defaults 1 1
LABEL=/boot /boot ext3 defaults 1 2
tmpfs /dev/shm tmpfs defaults 0 0
devpts /dev/pts devpts gid=5,mode=620 0 0
sysfs /sys sysfs defaults 0 0
proc /proc proc defaults 0 0
/dev/VolGroup00/LogVol01 swap swap defaults 0 0
/dev/dvdrw /media/dvd auto defaults 0 0
~
3.
/etc/yum.repos.d/fedora.repo
[fedora]
name=Fedora $releasever - $basearch
#baseurl=http://download.fedora.redhat.com/pub/fedora/linux/releases/$releasever/Everything/$basearch/os/
mirrorlist=http://mirrors.fedoraproject.org/mirrorlist?repo=fedora-$releasever&arch=$basearch
baseurl=file:///media/dvd/
enabled=1
gpgcheck=1
gpgkey=file:///etc/pki/rpm-gpg/RPM-GPG-KEY-fedora file:///etc/pki/rpm-gpg/RPM-GPG-KEY
You must have Internet connection.
Because the baseurl and mirrorlist point to Internet, when you add/remove software, it always contacts the Web site defined. If you does not have a direct Internet connection, "Unable to retrieve software information" error shows after a while. My network has a proxy server. I could access Internet but Add/Remove Software cannot access it.
How can I install the software from my DVD?
Take a look at the /etc/yum/repos.d
fedora-development.repo
fedora-updates.repo
fedora.repo
fedora-updates-testing.repo
The fedora.repo file controls the installation. Open it:
[fedora]
name=Fedora $releasever - $basearch
#baseurl=http://download.fedora.redhat.com/pub/fedora/linux/releases/$releasever/Everything/$basearch/os/
mirrorlist=http://mirrors.fedoraproject.org/mirrorlist?repo=fedora-$releasever&arch=$basearch
enabled=1
gpgcheck=1
gpgkey=file:///etc/pki/rpm-gpg/RPM-GPG-KEY-fedora file:///etc/pki/rpm-gpg/RPM-GPG-KEY
[fedora-debuginfo]
name=Fedora $releasever - $basearch - Debug
#baseurl=http://download.fedora.redhat.com/pub/fedora/linux/releases/$releasever/Everything/$basearch/debug/
mirrorlist=http://mirrors.fedoraproject.org/mirrorlist?repo=fedora-debug-$releasever&arch=$basearch
enabled=0
gpgcheck=1
gpgkey=file:///etc/pki/rpm-gpg/RPM-GPG-KEY-fedora file:///etc/pki/rpm-gpg/RPM-GPG-KEY
=========
To install the packages from DVD directly, you must run this step--With directly Internet connection, run Add/Remove Software. It will download something from Fedora site.
And then,
modify one line as shown below:
[fedora]
name=Fedora $releasever - $basearch
#baseurl=http://download.fedora.redhat.com/pub/fedora/linux/releases/$releasever/Everything/$basearch/os/
mirrorlist=http://mirrors.fedoraproject.org/mirrorlist?repo=fedora-$releasever&arch=$basearch
baseurl=file:///media/Fedora%207%20i386%20DVD/
enabled=1
gpgcheck=1
gpgkey=file:///etc/pki/rpm-gpg/RPM-GPG-KEY-fedora file:///etc/pki/rpm-gpg/RPM-GPG-KEY
[fedora-debuginfo]
name=Fedora $releasever - $basearch - Debug
#baseurl=http://download.fedora.redhat.com/pub/fedora/linux/releases/$releasever/Everything/$basearch/debug/
mirrorlist=http://mirrors.fedoraproject.org/mirrorlist?repo=fedora-debug-$releasever&arch=$basearch
enabled=0
gpgcheck=1
gpgkey=file:///etc/pki/rpm-gpg/RPM-GPG-KEY-fedora file:///etc/pki/rpm-gpg/RPM-GPG-KEY
modify the fedora-updates.repo file
[updates]
name=Fedora $releasever - $basearch - Updates
#baseurl=http://download.fedora.redhat.com/pub/fedora/linux/updates/$releasever/$basearch/
mirrorlist=http://mirrors.fedoraproject.org/mirrorlist?repo=updates-released-f$releasever&arch=$basearch
enabled=0
gpgcheck=1
gpgkey=file:///etc/pki/rpm-gpg/RPM-GPG-KEY-fedora
It took me a while to figure it out. Because of the space in the DVD name, it gave me a lot of trouble. I use the web browser to find out the name syntax. FireFox --File --open a file--locate the DVD
From the address shown on the address bar, I found the path to DVD.
My network has a proxy server. I must modify the yum configuration file /etc/yum.conf.
[main]
cachedir=/var/cache/yum
keepcache=1
debuglevel=2
logfile=/var/log/yum.log
exactarch=1
obsoletes=1
gpgcheck=1
plugins=1
metadata_expire=1800
proxy=http://15.168.35.240:80
You must see the following:

When the XFCE is in the list, Add/Remove Software can install the packages from DVD directly even I unplug the network cable.
===
If you don't want the long DVD name, complete the 3 steps:
1.
mkdir /media/dvd
2. /etc/fstab
/dev/VolGroup00/LogVol00 / ext3 defaults 1 1
LABEL=/boot /boot ext3 defaults 1 2
tmpfs /dev/shm tmpfs defaults 0 0
devpts /dev/pts devpts gid=5,mode=620 0 0
sysfs /sys sysfs defaults 0 0
proc /proc proc defaults 0 0
/dev/VolGroup00/LogVol01 swap swap defaults 0 0
/dev/dvdrw /media/dvd auto defaults 0 0
~
3.
/etc/yum.repos.d/fedora.repo
[fedora]
name=Fedora $releasever - $basearch
#baseurl=http://download.fedora.redhat.com/pub/fedora/linux/releases/$releasever/Everything/$basearch/os/
mirrorlist=http://mirrors.fedoraproject.org/mirrorlist?repo=fedora-$releasever&arch=$basearch
baseurl=file:///media/dvd/
enabled=1
gpgcheck=1
gpgkey=file:///etc/pki/rpm-gpg/RPM-GPG-KEY-fedora file:///etc/pki/rpm-gpg/RPM-GPG-KEY
Fedora7:Boot loader
A boot loader is a program started by the BIOS ROM after POST, which loads the Linux kernel into memory from a hard disk partition.
The most common place for the boot loader to reside is on the Master Boot Record (MBR); however, you can also place it on the first hard disk sector of the / or /boot filesystem partition if you want to use a boot loader from another operating system to load Linux. If the / or /boot partition starts after the 1024th cylinder of the hard disk (after the first 8 GB), you must pass a LBA32 (Large Block Addressing 23bit) to kernel. The System BIOS does not advertise this information to the boot loader.
I need to test it.
The most common place for the boot loader to reside is on the Master Boot Record (MBR); however, you can also place it on the first hard disk sector of the / or /boot filesystem partition if you want to use a boot loader from another operating system to load Linux. If the / or /boot partition starts after the 1024th cylinder of the hard disk (after the first 8 GB), you must pass a LBA32 (Large Block Addressing 23bit) to kernel. The System BIOS does not advertise this information to the boot loader.
I need to test it.
Subscribe to:
Posts (Atom)